Belted Kingfisher

Belted Kingfisher

Thursday, December 26, 2019

Boxing Day Birthday

Hello everyone! I hope everyone had a wonderful Christmas. Not only is today Boxing Day, but it is my birthday!!! Yay!!!!! I guess that means I'm another year older, Yikes!! LOL And yes I do get presents both days, Christmas and birthday.  My Mom always made sure to keep my birthday separate, as it should be right?

I don't have a birthday card to share today, but I do have a couple of Christmas cards I made last week, which I'm going to make a few more of the same and put these towards Christmas 2020.

Now the background idea was not mine, I saw these beautiful cards displayed over at The Foiled Fox, and right away I knew I had to make these backgrounds myself. I did 3 different coloured backgrounds, but the pink one, I messed it up so it went in the garbage.  But, I have the other 2 to share with you today.


First up is the blue - all done with distress oxide inks and MFT drifts and hills stencil.  Inks used were: stormy sky, peacock feathers, salty ocean, evergreen bough and chipped sapphire. Start by laying the stencil towards one side about 1/2 inch in from the edge, sponge the ink, then rotate the stencil to use one of the  another sides, and repeat until your entire cardstock is covered.  I also used canson 140lb watercolour paper for this.  I then spritzed the background with Imagine Sheer shimmer craft spray sparkle.  It leaves a beautiful sparkly background.  Not sure how well you can see it on the blue card, but think it's better on the green card to see.
I then cut out of gold mirri cardstock the tree.  The tree is from Inlovearts. I added a clear crystal rhinestone for the star and a couple of blue sequins on the tree.


For my second card again I used distress oxide inks and stencil - cracked pistachio, evergreen bough, pine needles, ice spruce, peacock feathers and twisted citron.
The tree die used is from Penny Black - Xmas tree border # 51-454  I cut it from two different green cardstocks, then offset them.  I also cut the front green piece using an MFT hill die, then stamped a sentiment from SSS, added some foam tape behind, then added chunky glitter along the top of the hill.  The tree die also has tiny star dies, so cut them out of the same greens and then adhered them here and there.


The pink background was very pretty, but when I went to emboss and branch on it I didn't like the way it turned out, so I will give the pink another try.

Enjoy the rest of your Holidays, thanks for stopping by.

Pauline

Tuesday, December 24, 2019

Merry Christmas..

Well cards are all mailed, presents all wrapped, house is cleaned and all the food is prepared as we are celebrating Christmas today with my family.  Mark, Anna and boys are on their way down. 


I wish everyone of you a safe and Happy Holiday.  Thank you for supporting me over the year, I truly appreciate your friendship.  May this Christmas season fill your home with joy, your heart with love and your life with laughter.  Looking forward to see what 2020 brings.  Warmest wishes......

Pauline

Monday, December 16, 2019

Peace, Prayers & Blessings

I hope you all had a good weekend.  Yesterday, Bill and I celebrated our 40th Wedding Anniversary - boy how the years sure fly! 

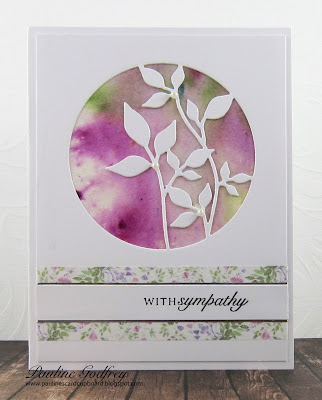
I mentioned a few weeks ago that one of my card orders consisted of sympathy cards.  Today I have 2 more to share with you.

My first card is using Alexandra Renke papers and washi tape.  I cut one of the birds using a circle die, then layered this onto another piece of white cardstock cut using Altenew Fine Frames Circle Dies. I like that this die allows the circles to stay together, or you can peel them apart and use them separately.

I also cut an Aliexpress floral die to lay behind the raised circle. I embossed the sentiment (PTI) using PSX detail platinum.


For my second card, I had some paper already made a while ago using Magenta Nuance powders. Every now and again I just decide to play and create different colour combo backgrounds to use at a later time.

I pulled out Simon Says Circle of Leaves die and cut this from white c/s.  I also added some washi tape (Aliexpress) along the bottom, then adhered my front panel to the coloured background. Sentiment is from PTI as well.  I added a couple of pieces of silver peel offs below and above the sentiment.  Pearls were added on the base of 3 leaves.


I hope I was able to inspire you today.  Thanks so much for visiting.  Have a happy day!

Pauline

Thursday, December 12, 2019

Purple Iris


So excited for today!  After our company Christmas lunch, I am officially on vacation until Jan 6, 2020!! Just over 3 weeks off, can't wait.

Today's card is one I made for one of my orders.  I was going through my bucket of partial made cards, and came across this image already water coloured some time ago.  I wasn't fond of it after I coloured it, so just tossed it into my bucket.

I was running out of time to get this order completed, so when I came across this I knew I needed to make this work somehow.  Not sure why I didn't like it before, but it seem to pass the test once I had it completed.


This is a Penny Black image, which was gold embossed onto some Canson watercolour paper.  I used my Zigs to colour.

I added some gold mirri paper at the top and bottom corner to accent the gold in the image.  I added this to a purple card base, added some pearls to finish off.  I also embossed a gold sentiment towards the bottom.

I hope you are having a great day!

Pauline

Monday, December 9, 2019

Peace

Hello everyone!  I'm a happy camper as I have all my Christmas card orders completed, and all my Christmas cards in the mail as of last week! Woohoot!!!! Such a good feeling. I massed produced some of my cards that I shared in Oct & Nov which help speed things up, as well as I had a few left from last year that I made.

Today's card is one I made using Memory Box dies - Ruffled Poinsettia #94296 and Petite Leaf Frame #94318.  The 'peace' is from IO # DIE226-A.


I die cut the poinsettia and frame from white linen c/s.  I layered it onto some smooth white c/s, then onto some gold mirri c/s.  Love the look between the two different whites.

The 'peace' was also cut 3 times - 2 from white and then from the gold mirri, and adhered together.
I popped the poinsettia up so I could tuck the leaves underneath.  I then used a Nuvo clear glitter pen and coloured the poinsettia to add sparkle, so pretty in real.

I adhered the Peace along the bottom and then added some prills to the center of the poinsettia.

I made 5 of these!

Thanks for stopping by, have yourself a wonderful day!

Pauline

Thursday, December 5, 2019

With Sympathy x 2


Hello.  Well I finally finished all my Christmas card orders as well as all my cards for my mailout.  I have 3 birthdays in December to make cards for, so that is next on my list.

Today, I'm sharing a couple of sympathy cards I made for one of my orders.

These were a quick make.  I used images from Alexandra Renke - just love her papers.  I cut out the images and layered them onto silver card stock.

I used some teal Bazzill card stock and used a stitched rectangle die to cut it out.  I then used Eucalyptus washi tape from Alexandra Renke (which goes with the images), and added a piece of this to the bottom of the teal c/s.

For my first card I used a die from Simon Says Stamps - Ecualyptus leaves


This one uses  a die from Simon Says Stamps - Cottage stems which seems to be discontinued as I couldn't find it on their website.


That's it for today. Have a wonderful day!

Pauline

Sunday, December 1, 2019

Nourish & Flourish


Sorry I haven't posted in almost a week.  I've been busy with another card order which I'm almost done. 14 cards this time, and the good thing about it is that I am just re-making cards that I have already posted, so this makes the process so much faster, as I just need to copy from my first card.

Can you believe that it is Dec 1 already! Yikes, still have Christmas cards to make, how about you?

Before I started this card order and right after I finished the last 19 cards, I made this one.  This is a digital image from Gracielliedesign called Nourish & Flourish. I love digitals for two reasons, does not take up space (only on your hard drive) and you can resize it to your preference.


I used copics to colour and believe it or not I actually remembered to write down the numbers this time!

This was pretty straight forward, so I will list the supplies below.

Supplies:
Image - digitial from Gracielliedesign - Nourish & Flourish
ink - printer, Copics - R30, R32, R35, R37, Y35, YG00, YG03, G97, G99, BG0000, BG10, C00, C01, C02
Paper - Bazzill Basics Paper pack - Vintage Lace, cougar white, Bazzill - kind of a sage green
Die - Aliexpress
Misc - silk ribbon, sequins, Nuvo glitter gloss aqua shimmer

Okay back to finishing up this order.  So glad you stopped by today.  Have yourself a wonderful day!

Pauline


Monday, November 25, 2019

Wishing you....


Good morning!  Hope you had a good weekend, and this posts finds you all well. I accomplished so much this weekend in the line of card making.  I finally finished my 19 card order, all the liners done, envelopes attached to each and all ready to deliver to my friend when we meet for dinner.

Yes, 19 sounds like a lot, but I was able to double up on some, some new ones and others were ones I had made previously but never have given to her in her previous orders, so this makes it fast for me as I had already made them once before! I made Christmas, birthday and sympathy.

Today's card is a Christmas one that worked up very fast.  I'm using Simon Says stamp set - Holiday Greetings Mix 1.


I started by embossing the image with gold embossing powder onto some white cougar 100lb c/s.  I added the 'wishing you a' and 'christmas' to complete the sentiment - also included in the set.

I used copics YG03, G97 & G99 to colour the leaves, and R39 for the red berries.

I had this gold shimmer oval already cut out and it seemed to work perfectly for this.  I stamped the card base using Simon Says Leaves & Berries Background stamp using versamark.  I then adhered the oval on top, added a felt poinsettia secured with a gold brad, then added some gold sequins to the image. Voila!

Thanks for visiting today, I really appreciate it.

Pauline


Friday, November 22, 2019

Sending caring thoughts


Hello everyone, I hope your week is going well.  While I continue to work on my Christmas cards, I change it up now and again with others.  I made this card a few weeks back, finally got around to photographing it.

The stamp set that I'm using is from The Greetery called Cotton Comforts. I love Betsy's sets, most are multiple step stamping, which gives it the realistic look.


I found cutting out the pieces before stamping makes it much easier to line up.  So once my floral pieces were cut out I stamped the branches then the flowers.  She makes it so easy.

I then cut some soft pink cardstock using The Greetery - Halfsies Dies, sponged some distress ink around the edges then spritz some metallic spray for some shine.

I also sponged some soft pink onto some white c/s, which my flowers would be mounted to.

Stamped the sentiment in dark brown ink and then die cut them out.  I love the variety of fonts she uses.

To finish off I added several pearls throughout the card.

I need to finish one of my card orders this weekend, as I meeting up with my friend Monday after work. 4 more to go for a total of 19 cards! Yikes.

Have yourself a wonderful weekend.

Pauline

Tuesday, November 19, 2019

Sassy Gal Nurse

Hello everyone! Today I have a different type of card to share.  My co-worker underwent surgery to remove his tonsils.  We put a little care package together and I was trying to come up with some sort of card a 'guy' would love.  I looked through my Art Impressions, but didn't have anything that would work, so hopped over to Bugaboo digital images and sure enough I came across Sassy Gal Nurse. Perfect!!


How fun is she??.  I used copics to colour her.  My first attempt I coloured her stockings black but did not like it, so thought hey, how about some fish net stockings. Love how these look! So as you can see not a lot of colouring on her, added some wood grain papers to give it a more 'masculine' feel to it.

Notice the little sentiment under her medical bag - well I am covering up a boo-boo! When I pulled my red copic cap off a spurt of ink fell right there, I tried to use my colourless blender to remove, but it seem to bleed more, so a sentiment was placed to cover it up.  I used Simon Says Stamps Sentiment Strips.  The nice thing about these strips is that you can use your laminator to adhere different colours of foil.  They are pre-printed in black ink so I applied some gold foil to it.

I also added some tooth hound washi tape, followed by a gold peel off.  Added some enamel dots to finish this off. 

Well that's it for me today, back again real soon!  Thanks for stopping bye, love when you do.

Pauline

Thursday, November 14, 2019

Fir & Foliage

Hi, I'm back today to share another Christmas card. I've been busy mass producing the cards I posted last week.  Those are quick cards as they are all die cut and no stamping.

For today's card I'm using a stamp set and matching die from The Greetery - Fir & Foliage No2.
I started one night just stamping a variety of trees in greens, blues, pinks, gray's etc.  I really liked the pink and gray together, so from that I build my card.


I didn't keep track of the distress oxide ink colours as I was just too busy creating them! I sponged the blue background using Tumbled Glass Oxide and Broken China oxide inks.  I then splattered some white paint.

The snowdrift die is also from The Greetery.  I love the pierced snow drifts on this.I added some foam tape behind the front pink tree and adhered the other two in behind the snow drift. Sentiment if from the Christmas Eve set also from The Greetery.  I added some little snowflake sequins and some tine circle sequins to the trees.  I also used the decorative tree trimming set to add that decorative layer to the gray tree.

These stamp sets are so easy to use, as they are multiple step stamping.  Just use my Misti and everything lines up perfectly.

Thanks for stopping by for a visit.  Have a wonderful day!

Pauline

Friday, November 8, 2019

Christmas Shadow Box

Hi everyone! TGIF!! I'm back today to share another Christmas card.  I did this 2 weeks ago, finally got around to take a picture and now I can share.

When I was in London a while ago at my favourite stamp store Stamp Art, Nancy shared some new designs her team has come up with.  Well when I saw this I new I had to have the die right away.  So in my basket it went. I replicated her card and then I created one of my own.

The die set is from Sizzix - Christmas Shadow Box #663611

First card is very similar to Nancy's card:
- die cut the tree arch for top layer
- sponge some tumbled glass distress oxide ink on my base layer
- cut trees and adhere to base layer
- adhered some light blue shimmer fine tulle tot he back of the top layer
- cut deer and add to bottom right
- add peel off sentiment


And this is what I came up with:
die cut the tree arch for top layer
- sponge some tumbled glass distress oxide ink on my base layer
- cut trees and adhere to base layer
- cut bunny from  gold shimmer and sprigs from white c/s and adhered to bottom right
- cut holy leaves from dark green shimmer and sprigs from  gold c/s and adhered to top center, then                 added 3 tiny gold beads
- added gold Merry Christmas peel off, as well as some peel off stars to the tops of the trees


These were fun cards to make and so simple as it is all die cuts.  I will be making more of these to add to my Christmas stash this year, and to fill some orders.

I hope your enjoyed my post today.  I appreciate you stopping by.  Have a wonderful weekend.

Pauline


Monday, November 4, 2019

Chickadeer

I'm back today to share another Christmas card- YAY!!!!!!!  Card making has been quite slow lately, I have explained at the end of the post why.

A few weeks back I was going through my Christmas stamps and came across a few that I have not even touched yet.  It's just like Christmas finding new stamps that you kind of completely forgotten about! LOL.

So here is Stamping Bella's Chickadeer. How cute is this image?


Again, I used Polychromos pencils and gamsol to colour.  Once coloured I cut a some snowy hills using The Greetery Drifting die set. Love this set, it cuts and pierces.

Paper used is from Penny Black Holiday Trimmings. I was debating on whether or not to put a sentiment on the front, so played around with several and ended up using the sentiment from The Greetery called Sentiment Suite : Christmas Stamp Set and matching Sentiment Suite die set.  The one good thing about the sentiment sets so far from The Greetery is that the die set she created matches her last 3 sentiment sets. I'm probably not explaining it correctly, but if you go the The Greetery or click on the link's above I created you will see what I mean.

For finishing touches I used some twine and glitter.

I hope I inspired you today, have yourself a fabulous day!

PS - on the health issue I have been having with my RA - Rheumatoid Arthiritis - well I went for my yearly checkup with my specialist today in London and the reason my feet have been so sore and my right wrist swollen and left hand knuckle issue for months is that my RA is doing a major flare up.  I haven't had any bad flare ups in a couple of years. Normally my flare ups are very painful and only last 2 days, - the type I have is called Palindromic Rheumatism. My feet have been so sore and as of late they are so painful it even hurts to walk or to even rest my feet my bones in my feet are very painful, and my ankles throb terribly when I'm standing or moving. Here I thought it was Planters Fasciitis all along, had a pair of orthotics made for my running shoes and no relief, actually my feet were getting worse.  I never experienced pain like this before in my feet so believed it was something other than RA.  She sent me for xrays and blood work and will follow up with me once she gets the results back.  Card making hasn't been very fruitful lately, with being in pain I have no desire to stamp.  I still continue to dabble at it, but I really need to get going as I have a few orders plus my own Christmas cards to make and time is slipping away.  Sorry for blabbling on and thanks for listening! :)

Thanks for your visit today,
Pauline

Thursday, October 31, 2019

Sweet Baby

Happy Halloween!! Sorry I do not have a Halloween card to share with you, as I really don't seem to make those. I sure hope the rain stops tonight for the Trick or Treaters, it's been raining since Wed morning. We don't get too many in our neighborhood as we live just on the outskirts of town, and most of who lives here, their children are grown up and gone.Although we have parents from the country drive their little guys into our neighborhood for treats. But with the rain we will even get less.  One year we only had 7 because of poor weather.  Fingers crossed it clears up.

One of my co-workers is expecting their first baby in about 3 weeks.  I wanted to make her a 'special' card to welcome her new baby boy into the world.  She buys plenty of cards from me, so didn't want to make something she might of already seen.


The baby clothes dies were purchased from Aliexpress back in the summer.  I also purchases a baby girl set as well.  I kind of had a vision on what I wanted, so did some die cutting, pulled some papers and then everything else came together.

I thought I had some small clothes pins, but they were actually too big, so I added some small gold beads to act as the clothes pins.

The sentiment is from Papertrey Ink - Daily design sentiments, stamped in black versafine and then used a tag die from The Greetery.  I added some flowers, pearls and used my Nuvo clear glitter pen for a bit of sparkle on the flowers. Paper is from Echo Park - Bundle of Joy!.

Now I can't wait to make another one of these for my sale basket as well as one of the baby girl, but I really need to work on some card orders I received for Christmas, Birthday and Sympathy.

I'm so glad you stopped by today. Have yourself a fabulous day!

Pauline


Monday, October 28, 2019

Cosmo Bella

Hello there!  Hope you had a good weekend.  I just finished a baby card, but haven't had a chance to take a picture yet, so thought I would share my last of the Bella's I coloured from the group of 5.

This is Cosmobella.  She seems to be my go to girl, when I need a girl friend card, as I have coloured her many times.  I pulled out my Polychromos pencils and blended with gamsol.


I used a MFT set of edgers to cut the scallop arch on the pink and a Simon Says edger for the white layer. Layered these together, then added a narrow strip of dp along the edge for some interest. 

To finish off I added some enamel dots, Nuvo glitter pen on her martini, and some twine.

I appreciate your visit, see you here again real soon.  Have a great day!

Pauline

Monday, October 21, 2019

Rudolph

Hope you had a good weekend!  I finally finished up a couple of Christmas cards on the weekend, so today I'm sharing a Whimsy image called Rudolph! I believe I bought this last winter and never had a chance to colour it up.


Polychromos pencils where used to colour.  I then used MFT Inside & Out Stitch Round Rectangle to cut him out. 

Paper is from Echo Park - I love winter.  I wanted to put a sentiment on the front, so played around with many sentiments - banner style, round but nothing appealed to me.  I then pulled out some dies and ended up going with Happy Holidays which is from IO.

To finish off I added some red glitter from Art Institute on the berries and added a few enamel dots.

I'm so glad you stopped by today.  Have yourself a fabulous day!

Pauline


Tuesday, October 15, 2019

Madison has a margarita

Well it's back to work after our long weekend here in Canada, where we celebrated Thanksgiving. I had a chance to work on some Christmas cards yesterday, but I don't have them totally completed, colouring is done but that's it.  So with that being said, I will share another Stamping Bella image today.

This is "Madison has a Margarita"!


She is coloured using Polychromos pencils, (which seems my go to medium as of late), and blended out using gamsol.

I used a very old set of Spellbinder dies to cut her out - long rectangle.  Designer paper is from Authentique - Blissful collection.(2011).

I added some sparkle to her drink using Nuvo glitter pen, added some sequins and ribbon to finish this off.

I'm so glad you stopped by today, have yourself a wonderful day!

Pauline

Thursday, October 10, 2019

Winobella

As promised I'm back today to share another Stamping Bella image.  This is the 3rd of the 5 I made.
This is Winobella.  Looks like she is getting ready to Party!!!


I coloured her using Polychromos pencils and blended with gamsol.  Once coloured I then cut her out using an MFT die, left the die in place and sponged some soft pink around the edges.

Designer paper is from my scrap basket.  I cut a little stitched flag tag, added a silk bow and a rhinestone.
Added some sparkle to the wine glasses and her dress using my Nuvo glitter clear pen, then added some more rhinestones.

Well that wraps it up for today.  Wishing you an fabulous day!

Pauline


Monday, October 7, 2019

Spring/summer birds #2

Hello! Bill and I spent  last week up north at Algonquin Provincial Park. Beautiful fall colours to be seen, yellows, oranges, reds, browns, burgundy, truly remarkable.  We have lots of pictures to go through, so when we do I will have some to share. Until then,  I thought I would share some more Spring/summer bird photos that I've been working on over the last little bit in between card making.


First up we have the Ruby Throated Hummingbird - in our backyard doing a little fluttering of his wings.

Here we have a  robin cooling off in the bird bath during a hot day in August. He/she spent almost 10 min in there splashing around, love the water spray.


Next is a Canada Warbler - I tried to photograph him last year but had no luck. 


Playing a little hide-n-seek was this Chestnut Sided Warbler.  Love him peeking out from the top of the branch.

Along the country side roads was this black swallowtail fluttering around. He stopped just long enough to capture this picture.


I'm working on more photos from the summer, it takes a while to do one as I still don't fully understand all the processing techniques, but slowly getting there. I try to do as much as I can and keep tackling them, when I get stuck at a certain point and can't figure it out I call for Bill's help!   I hope you enjoyed these, next post will be a Bella girl, stay tuned.

Pauline

Tuesday, October 1, 2019

Come play with us

Happy first of October.  This year is flying by don't you think? Rather than bore you with another Stamping Bella image, I thought best to change it up and bit and share a Christmas card.

This adorable image is a digital from Sassy Cheryl's called 'come play with us'. This is just the sweetest image as I just love snowmen.


Again I used Polychromos pencils and blended with gamsol.  I cut a white frame using MFT Stitched square frame die, The snowflake is from Memory Box, as well as the papers.

I added lots of glitter to the bottom for snow as well as around the image and a little pink glittered enamel dot to the center of the bow on the hanging snowflake.

This was a quick to do card, not a lot of colouring which speeds it up.

Thanks for your visit, have a wonderful day!

Pauline

Friday, September 27, 2019

Opal the Optimist

Happy Friday! I'm back today to share another Stamping Bella image. This is # 2 of 5 that I coloured up.
This pretty gal is called Opal the Optimist.


I coloured her up using Polychromos pencils and blended with gamsol.  I then cut her out using a scallop edge rectangle die from MFT.  The only difference is that I didn't want it as wide as it cut so put the die back over the image to where I wanted it cut narrower and ran it through my Platinum.  I then used my life changing brush and softly added a bit of PTI aqua mist to the bottom right side.

The Lacy scroll along the side is from Tutti Designs called butterfly Scroll. Background designer paper is from Prima - Bella Rouge.

For finishing touches I added some $store rhinestones to the butterfly scroll, and Nuvo glitter pen to the flowers on her dress and glass of wine.

Thanks for stopping by today, I always appreciate when you do.  Have a great weekend!

Pauline

Monday, September 23, 2019

Coffeeabella

Today, I'm sharing one of the Stamping Bella images I coloured up for a co-worker.  I had to make 5, so here is the first one.

This is 'don'ttalktomebeforemycoffeeABELLA"!  I've had her forever, and this is the first time colouring her up.


I used polychromos pencils to colour.  Once coloured I cut her out using MFT In & Out Diagonal stitched rectangle stax. I then layered the image onto some PTI Cocoa Bean c/s.

Designer paper is from Basic Grey - Curio paper - This is from 2010!

To finish off I added some enamel dots, and I die cut a piece of BG solid dp using Memory Box curled ribbons - there are 2 ribbons in this set, I cut one  twice and glued together for extra thickness. Nuvo aqua shimmer clear pen was added to her shoes and top, it's just a hint of glitter not much.

Thanks for stopping by today, wishing you a wonderful day!

Pauline


Friday, September 20, 2019

Two hearts

I had a request from a co-worker for a wedding card for her sisters wedding.  She wanted something special and personalized.  I decided to add their names and date of wedding to the front of the card.


Not a lot of explaining on this, so I will just list the supplies below:

DIES-
 Penny Black - love
Simon Says Stampes - stitched flag banner die
Wild Rose Studio - Elegant frames
Justrite dies - Open Leaf Vines
Memory Box - citrus leaves

MISC -
Wild Orchid Crafts - flowers
Studio Callico - wooden heart
Pearls
Novo aqua shimmer pen - glkitter gloss
sequins

That's it for me this week.  I've been working on some Stamping Bella cards for a co-worker - 5 of them! Stay tuned for postings next week of them.  Have a wonderful day!

Pauline


Monday, September 16, 2019

Butterfly blooms

A few weeks ago, when I was in a rut and just couldn't get my stamping groove going, I was on Instagram checking out all the new posts.  I came across a card made by Melissa Phillips using some Papertrey Ink stamps and dies, which led me to pull out the sets she used and create a card.  Sometimes you just need that little shove to get going.


The butterfly and small flowers are from the PTI Butterfly Blooms set and the other flowers are from Stitching Garden set. All stamped using PTI inks.

For the background that is behind the white die cut, is a piece of watercolour paper I was testing out my new TH Oxide spray inks on.  It just so happened once I stamped and die cut the flowers I was looking for something to put behind the die cut, and this piece seems to work perfectly.

The die cut is SB Antiquities square, layered onto a piece of PTI Fine Linen and then onto some gold shimmer c/s. 

I sponged ink around the center piece and then embossed the butterfly in gold.

To finish off I added pearls and some little $ store rhinestones to the centers of the flowers.

Wishing you a wonderful day.  Thanks for your visit!

Pauline

Tuesday, September 10, 2019

Acrobats

I'm back today to share a Christmas card.  I can't believe we are already into September and I only have a couple done, really need to crack down!

This is a digital image from Sassy Cheryl's called Acrobats.


After resizing I used my poloychromos pencils to colour.  Cut out with a stitched rectangle, then layered onto some dark red c/s.

The background designer paper was from my scrap basket, so unsure of the company's name. I used a sentiment from Penny Black - holiday snippets, and embossed using white e/p onto some black c/s.
Cut this out using a Spellbinders tag die.  Added some red twine around the card and then adhered the tag and secured with a bow.

Used TH rock candy glitter for the snow.

Thanks for visiting today, have yourself a fabulous day!

Pauline

Friday, September 6, 2019

A new little someone

Hello! Hope your week is going well.  So glad it's the weekend, and it's a 3 day weekend for me!  I had a request from a co-worker for a baby boy card using rainbow colours. After I made the card for her I asked her why rainbow colours and this is the reason which I never heard of: "A rainbow baby is a name coined for a healthy baby born after losing a baby due to miscarriage, infant loss, stillbirth, or neonatal death." I actually had to make 2 'rainbow' baby cards as she has 2 friends that both lost a child during pregnancy.  That is so sad.

So, put my thinking cap on and went to work.  I actually struggled quite a bit with this as I really don't have much in the line of something babish that I could using these bright colours on.

Headed over to Pinterest - my source for inspiration, and came a cross a similar card as mine below.


I sponged tumbled glass distress oxide ink in the background using MFT cloud stencil, then trimmed down using PTI rectangle dies.  I stamped the image onto some cougar white c/s and coloured with copics.  I also stamped the image onto my sponged cloud background, then fussy cut my coloured image and then adhered it over the stamped image. 

For the sentiment, I embossed using white e/p onto some navy cardstock.  Image is from PTI.

For finishing touches I added some glitter to the balloons, and couple of matte enamel dots and a little heart on the sentiment strip.

I really appreciate your visit today.  Have a wonderful weekend.

Pauline

Tuesday, September 3, 2019

Robin & Wren


Hello everyone.  I hope you all had a wonderful long Labour Day Weekend! Weather was so perfect here, very little humidity,  a bit of rain, but overall just an awesome weekend!  Bill and I ventured out to see if we could find any early fall migrants moving from the north to the south.  We did come across a few, still very few, so hopefully over the next couple of weekends we will be able to see more as the continue to fly south.

Which brings me to my card today. You know anything 'nature' related I'm in!  I am in love with 'The Greetery' stamp sets.  Betsy is amazing, very talented in many ways from her designing images to her beautiful display of cards.  I just can't get enough of her images.  My latest order from her Aug release, I receive one of two pkgs today, I think I got charged duty and taxes on the other because I have not received it yet.  It just cleared the border, so I expect to pay some additional costs on that package. Oh also, I was one of the winners from her last release as well.  I was selected from 'day 3' winner and received $50 gift cert - how exciting was that.  I never win anything!!

Okay so enough of that, now for my card.  I am using the Robin and Wren set.  What I love about Betsy's sets is that they are multi-step stamping - love, love!


Sadly enough, I did not keep track of the inks I used as I made this a few weeks ago.  For the background I sponged some distress oxide inks using my life changing brushes. I really like these brushes especially for soft backgrounds as I find sometimes with other sponges you can apply too heavily, where these they just seem to apply soft and if you want darker you just keep repeating.

I cut out all the pieces using the matching dies, then stamped the images onto the die cuts.  For the sentiment I used one of the sentiments from The Greetery set called 'thinking of you, which was stamped in black versafine.

To finish I added some little floral sequins, wink of stella clear glitter, and some clear dots to the centers of the flowers.

I hope to get a chance one night this week to work on another card using The Greetery stamps.  Thanks for your visit.  Have a fabulous day!

Pauline


Monday, August 26, 2019

Wedding/Shower cards

Hello everyone.  Last month I was busy working on Wedding and Wedding shower cards.  I have done this layout many times, and love it.  It's my 'go to' wedding shower card. 

I actually did 3 cards at the same time, just changed papers, or colours etc on each, but generally the same.


Not a lot of explaining on these, the wedding dress is a embossing folder from Coutures.  Flowers are from Wild Orchid Crafts. Stitched frame is from MFT.

Thanks for stopping by today, I love when you do.  Have yourself a fabulous day!

Pauline

Thursday, August 22, 2019

Hope your day is fabulous

Hello! Did you think I fell off the face of the earth? Well, I didn't, just been busy with many things in my life. Have had some health issues with my feet - planters fasciitis - very painful.  I had to get orthotics and gradually break them in over a few weeks. This past weekend, something terrible happened and I could barely walk for 2 days.  My feet were so sore it was unbelievable.  Then I experience over the last month swelling of the ankles everyday.  I would ice them at night put my feet up, take advil, they looked good in the morning the it would happen all over again. I also had a flare up with my RA (Rheumatoid Arthritis) this past weekend as well.  When it rains it pours, so they say!   But must say I think I'm on the mend - thank goodness! It's been a rough month.

My card today is one I made over a month ago, but just never posted it.  I'm using Altenew - build a flower Cattleya.


I had already made the background a while ago using Magenta Nuance powders, so this came in handy when I was doing this card.  I stamped the flower onto some Canson watercolour paper using black memento and then water coloured it.  I'm sorry I don't even remember what inks I used to colour this with.

I cut out a couple of stitched circles to layer underneath the Cattleya flower.  I stamped the sentiment onto some white cardstock and then cut it with a banner die.  The sentiment is one of a few that come with the stamp set.

I added foam tape behind the flower for dimension, added some glitter to the centers of the flower and some enamel dots for accents.  I also added a strip of silver paper along the right side.

Thank you for your visit today, I will be back soon.  Have a fabulous day!

Pauline


Thursday, August 1, 2019

On Your Special Day

I'm back today to share another Wedding Card.  Not a lot of explaining on my wedding cards as most are die cuts, flowers and paper.


Background paper is from Prima Marketing - Princess line.  I used this for the rectangle layer on top of the white die cut as well.

Sentiment is from Just Rite stamps- Every After Antique Labels One

Flowers are from Wild Orchid crafts

Die cuts are from Aliexpress.  The top layers is cut from Antique Gold Matte Cardstock

Ribbon is from my ribbon basket.

Added some wink of stella to all the flowers, gold pearls and some glittery rhinestones.

Thank you for stopping by today, have a great day!

Pauline

Monday, July 29, 2019

Flower Teddy


Today, I have a cute little card to share with you.  I actually had this coloured up about 3 weeks ago and then just never did anything with you.  So, yesterday I decided it was time to dive into making cards again, as it seems I've been 'slacking' lately.

This cute little bear is called Flower Teddy by Penny Black.  I used my Faber Castell Polychromos pencils to colour.


Using my life changing brushes and oxide inks ( spun sugar, mowed lawn, and tumbled glass),   I went around the image lightly to add shading. I love these brushes, as I have a variety of sizes to get into those small spaces without masking. 

I pulled some papers to see what best suited this image, and came across some Lawn Fawn - perfectly plaid paper. I cut a strip for the bottom then added a piece of glitter washi tape (found in the clearance bin at Micheals :) ) to cover the seam between the two.  I stamped the sentiment using black versafine - this sentiment comes with the image. 

For finishing touches I added some enamel dots, nuvo clear glitter pen for the centers of the flowers and I also added some white dots on the cheeks of the bear and center of the flowers.

Well that's it for me for today.  Wishing you a fabulous day!

Pauline


Wednesday, July 24, 2019

Spring birds #1

Rather than share another card (wedding cards that I made a few weeks ago) I decided to share some of my photographs from this spring.  I had mentioned a few weeks ago that Bill is teaching me how to process my pictures.  It's not easy, and lots to learn, but slowly getting there. 

The first 4 pictures were taken at Pt Pelee National Park in May. Love these warblers, but they are very hard to photograph as they never sit still. So lots of pictures are taken but good thing for digital as you can just delete the bad ones!

(click on the picture to enlarge)


The next two were taken up north as this is where more of them head for breeding. Bill and I took a day trip up just south of Tobermory ON (4.5 hrs each way) and we did this in a day. Let around 3:30am and left to come home around 4 pm.  It's a long day but so worth it.  I took many more pictures up there but just don't have them all processed yet. One of my favourites was this cute little wren. I have the wrong name on the border which I need to change. This is actually a house wren not a winter wren.

Hope you enjoyed these.  I'll have more soon to share.
Have a wonderful day!

Pauline

Friday, July 19, 2019

Masculine thanks

I have 2 cards to share with you today.  Nothing special, just working on some extra cards for my basket. I'm trying to work on cards that I don't already have or cards where I've been asked if I have them and usually don't.

I made a couple of masculine thank you cards.  Love how quickly these worked up.

For my first card was so simple, just one die and cardstock.  I saw a card like this made by Laura Bassen over on the Simon Says blog last year.  The triangle die is from SSS - stripes card wrap (SSSD111781). I used coordinating papers from Papertrey Ink and SU.  Thanks (SSS - Big Thanks Words) was embossed with white EP onto some black cardstock then trimmed.  I added some enamel dots to finish this off.


For my second card, I started with some watercolour paper, added a couple of sprinkles of  Nuvo shimmer powder - golden sparkler, then spritzed with water.  This powder has gold mica powder in it so has a lot of shimmer, just gorgeous.  I then used MFT wonky rectangle die to cut it out, layered it onto some gold shimmer c/s then SU navy cardstock for the base.

The triangle layer on top is from SSS - stacked diamonds.  I cut this from cream flecked c/s, also cut it from some of the scraps left over from the background once I trimmed it down, so I could use the diamond centers to fill back in here and there.  The 'thanks' was cut from SSS die using navy c/s.  I cut this 3 times then adhered them together. To finish off  I added some enamel dots as well.


Well that's it for me.  I'm off today, good thing because it is suppose to reach 91F feeling like 115F with the humidex. and for Saturday too. Way too hot for outside, but have lots to do inside (like making cards - wink!)

Thanks for visiting, wishing you a wonderful weekend.

Pauline


Sunday, July 14, 2019

Wedding wishes

It's been a while since my last post I thought I best post something.  I haven't been doing too munch in the line of stamping the last few weeks, weekends have been busy as well as work.  I try to squeeze a bit of crafting when I can.  I find summers are hard to work on cards as I enjoy the outdoors, so spend time outdoors when the weather is good.  Although it has been extremely hot, the evenings aren't too bad once the sun goes down.  Looks like we are in for another rough few days of extreme heat middle to end of the week, with temps around the 40C (104F) mark. This coming friday it is suppose to feel like 46C (115F), thank goodness for air conditioning!

Okay, on with my card for today.  I mentioned that I was working on wedding cards for my basket. I hope you don't get too bored with them as I have another one to share today.


Not a lot of explaining on this, so will list the supplies below.

Paper - white cougar 100lb, bazzill light blue, Prima Marketing - Fairy Belle
Die - Creative Expressions - Scandinavian Collection - Stockholm
Stamps - Verve - Wishful Elegance
Misc - Wild Orchid flowers, Prima Flowers,  pearls, dollar store glittery rhinestones,  Nuvo aqua shimmer glimmer gloss, foam tape, versamark, Ranger Liquid Platinum embossing powder

PS - I've been working on  some of my spring/summer bird photos.  Bill has been teaching me. I hope to have some to post very shortly.

Wishing you a fabulous day!

Pauline