Belted Kingfisher

Belted Kingfisher
Showing posts with label Valentine. Show all posts

Monday, January 30, 2023

Sending XOXO


 Hello friends, today I have a couple of Valentine cards I made for my friends order.  

I've always been inspired by cards made with paper strips, so I cut a bunch of strips, different widths, and a variety of pink, coral and red tones.

I started by adding some dot tape runner across some which cardstock, then laid the strips straight across until I had the length I wanted.  I then took my Spellbinders heart die and cut it out on an angel so I wouldn't have the strips going horizontal.
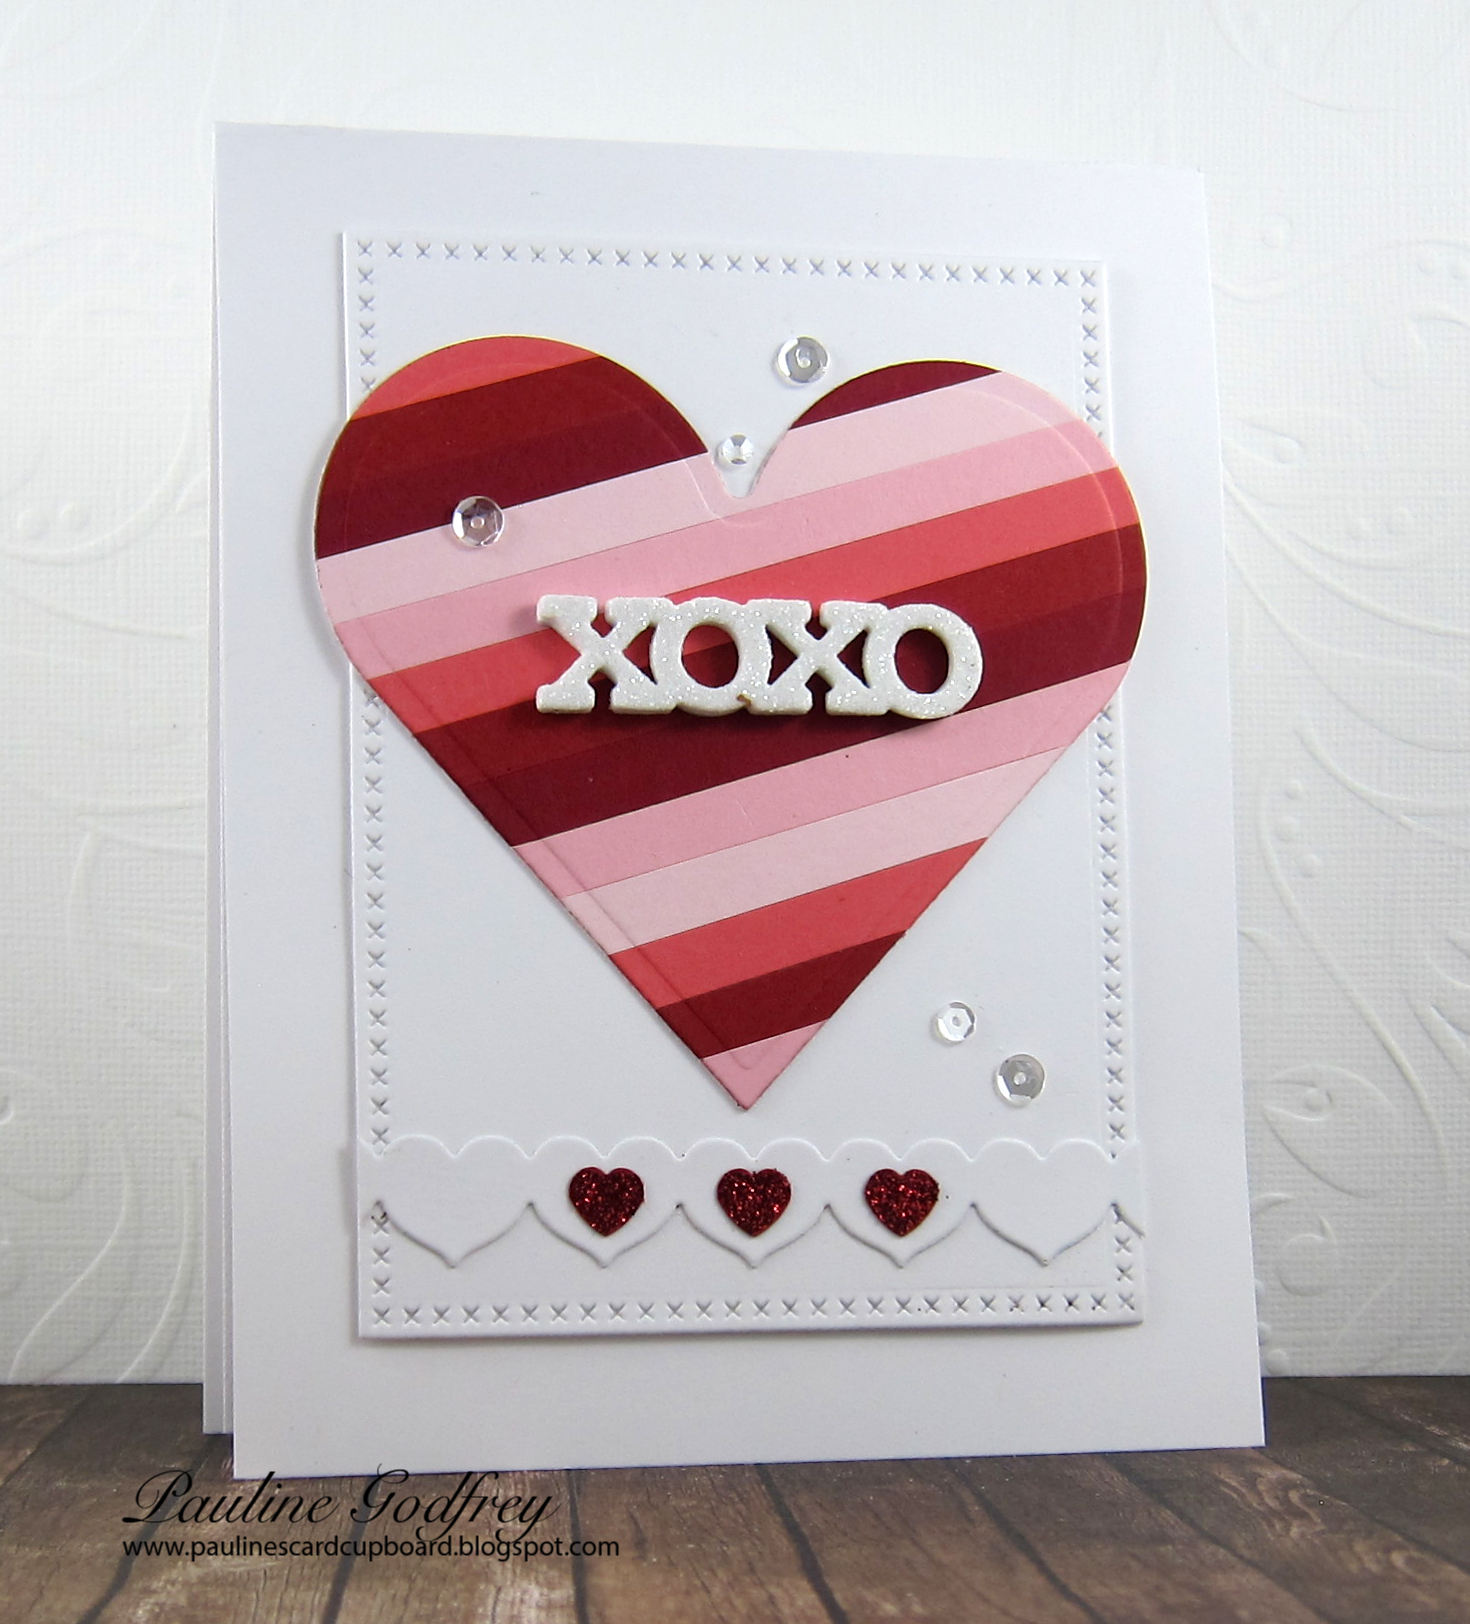


I cut a smaller panel using MFT cross stitch rectangle to lay my heart onto.  I also use a strip heart die from Papertrey Ink to cut a row of hearts.

Once the heart and strip of hearts were adhered to the cross stitch panel, I cut a couple more panels just slightly smaller than than the cross stitch panel and adhered to the back to give it some dimension.  I know I could of used foam for my layer but I find that can get to bulky by the time you get everything else on your card.  I cut the 'xoxo' die  - 2x from white card stock and once from Spellbinders white glittered foam and adhered together.

I know it looks like the 'XOXO' is not straight but it is.  I used my T-ruler to line it up.  I think it is because of the diagonal strips that makes it look a bit off.

To finish this one off,  I added some clear sequins, and punched 3 red hearts, adhered to the strip of hearts, then added some red art institute glitter for some sparkle. 

 For my second card, which is done basically the same, but I made the strips different widths and added some red rhinestones to finish off.


I was asked by one of my co-workers for 3 of these cards for her 3 children, one in blues (for her little boy), one in purples and the other like above.

I thank you for stopping in today, wishing you a wonderful day! See you again real soon,

Pauline

Monday, January 18, 2021

Branches of Love

 Hello everyone! I hope you are all doing well.  Sorry for my absence, I took a much needed break, but ready to get back at crafting once again.

Today I have a  valentine card to share - one of two requested by a friend.  

Dies and stamp sets are from PTI - Ink to Paper - Border bling: Tin stitched die and Branches of Love, stamp and matching die set.


To stamp the branches, I die cut it first, then placed the branch back into the negative piece, put it in my misti, then lined up the branch stamp over top.  The branch was stamped in PTI olive twist.  For the flower pot, I did the same, and used Altenew Limestone - very lightly on the first layer, the a bit heavier on the second stamp (the pot is a two step stamp set).

Background in pink is using the Border Bling die.  I also cut a white piece that fits over the center portion of the border bling die using MFT stitched rectangle.  I added some dimension behind the flower pot but adhered the branch flat to the card.  Die cut a variety of pink/red hearts and added them here and there.  

Stamped Penny black sentiment ' just for you' using black versafine.  Added some clear sequins to finish this off, as well as nuvo clear glitter pen which was applied to the hearts for some shimmer. 

I"ll be back later in the week to share the other valentine card.

As always I appreciate you stopping by.  Take care, stay safe,

Pauline

Monday, February 17, 2020

Lots of love

Hello and Happy Monday.  I'm off work today as in Ontario we are celebrating Family Day. 

I have one more Valentine card to share, I hope you don't mind, as I know you're probably getting tired of seeing so many. 

I made this one for my co-worker.   When I showed her the cute little envelope stamp and die set from The Greetery, she asked if I could make her one for her husband.


All stamps and dies are from The Greetery. I used PTI ink - spring rain, and weathervane (second generation stamping) to create my background using various stamps.

Envelope was embossed with detail platinum embossing powder.  The liner of the envelope was stamped in weathervane, and the hearts were stamped in PTI - pure poppy. The little tag that has lots of love stamped on it, is just tucked inside the envelope as she wanted to write a message on the back, but the envelope itself is popped up on foam tape.

It was a quick card to create once I got going on it.

Thanks for stopping by today.  Wishing you a fabulous Monday!
I have a watercoloured card to share with you later this week. Stay tuned!

Pauline

Supplies:
Stamps and matching dies  - Pretty postmarks, Signed & Sealed, Signed & sealed with a kiss
dies -The Greetery - Postal Frame dies & Inside & out berry branch.
Ink - PTI - weathervane, pure poppy, spring rain, Versafine - black
Paper - SSS - Fog, PTI Smokey Shadow, Cougar White
Misc - enamel dots

Thursday, February 13, 2020

Love - to my sweetheart


Hello, I'm back today to share another Valentine card, but I guess you could also use this for an Anniversary card as well.

I don't normally make a lot of Valentine cards, but this year for some reason I've made a few.


The made the heart background with SSS heart stencil and paste onto some SSS fog c/s.  Once dried I added my flag banner and hearts cut from scrap papers.

The love word was cut from black c/s layered onto a piece of vellum. Sentiment was stamped onto a piece of dp using black versafine, and popped up.

I added some hearts, sequins, rhinestone and a wooden heart to finish this off.

Supplies:
Stamp - The Greetery - Sentiment Suite - Love

Dies - SSS - Love, Spellbinder - Hearts, SSS - Flag, Memory Box - Mini heart collection
Paper -  SSS - Fog, Cougar White, MME- Love me, Glitz - pretty in pink, black
Misc - SSS - Tumbling Heart Stencil, sequins, rhinestone, wooden heart, Wendy Vecchi embossing paste

Wishing you a wonderful Valentines Day tomorrow! Have a great weekend!

Pauline

Monday, February 3, 2020

Sending sweet thoughts

Hello everyone, I hope you had a good weekend. 

Today I have another Valentine card to share.  Although, I guess you could use this for a 'thinking of you' or a birthday as well. 


I started with a piece of Tim Holtz watercolour paper.  I smooshed distress inks onto my craft mat, spritz with water and then laid my paper onto it, picked it up and heat set.  I continued to do this until I was happy with the outcome.

I then cut two of the heart frames and glued them together.  I kept some of the hearts to add back into the negative areas once the card was completed.

For the center heart, I cut the solid heart from aqua mist c/s, and then the leafy floral overlay from some valentine designer paper from Cosmo Cricket. The sentiment I used is actually a little verse from Ink to Paper.  I masked off the a portion of it, as I only wanted to use "sending you sweet thoughts', and stamped using black versafine.

Once everything was together, I placed a small amount of glue into the negative spots on the heart frame and added the hearts here and there.  I also added some sequins and a heart rhinestone.

I love how this turned out.  I might just have to make another one using different distress inks.

I appreciate your visit, have a fabulous day!

Supplies:
Stamps - Ink to Paper - Inside Greetings: Valentine
Die:  Papertrey Ink - Bold Borders - Love die, Memory Box - Cupid Heart, Serafina Heart
Paper - Tim Holtz distress watercolour, white, PTI - aqua mist, Cosmo Cricket DP
Ink - black versafine,  Distress Oxide - peacock feathers, salty ocean, cracked pistashio, twisted citron, picked raspberry, spice marmalade
Misc - sequins, heart gem, foam tape

Pauline

Monday, January 21, 2019

You totally Rock!!

Hello and Happy Monday to all!  I hope you had a good weekend.  We had a very cold and wintery weekend, about a foot of snow and very cold temperatures  - a high of -4F or -22 C.

I almost feel like I should be sharing a Christmas card with you based on the weather, but since I don't have any made up yet for this year, I will share another Valentine card using another Power Poppy digital image from the Va Va Valentine images.

This one I call You Totally Rock.


I started by resizing the image and then colouring using Polychromos pencils and gamsol.  (Leslie, to answer your question whether or not I use gamsol with the Polychromos  - yes I do use gamsol with these. They blend so well, I just love them).

I wasn't sure where I was going with this layout, as  you can see I have a couple of different die cuts cut. I was just going to layer the image onto the black heart circle, but wanted to incorporate some red as well, so ended up using both die cuts.

I added some black gingham ribbon across the top as well as some die cut hears.  The center of the larger heart in the image, I added some red glitter for that bit of added sparkle.

Supplies:
Image - Power Poppy digital - Va Va Valentine
Ink - printer, polychromos pencils and gamsol
Paper - MME - Lucky in Love & Cosmo Cricket - Head over heal, black, white cougar 100 lb
Dies - MFT - square pierced frame, Spellbinders - heart circle & circle die, Verve - heart dies
Misc - gingham ribbon, red glitter, quickie glue pen for the glitter

Thank you for stopping by, see you soon. Have a great day!

Pauline

Friday, January 25, 2013

Sketch challenge #2

Hi all!  TGIF, and that means another bellariffic challenge.  This week we have a sketch to follow.
I pulled out this cute Izzie image to colour - Izzie has a lettah. Perfect for Valentines or anytime!

Not your typical Valentine colours, but does it always have to be red?  Anywho, she was coloured using copics after she was stamped on bella's bestest paper. Shading and grass was done with prismacolour pencils. I cut her out using an oval s/binder die, then layered her onto a piece of aqua bazzill paper cut using s/binder labels twenty.

Designer paper is by October Afternoon - Sidewalks.  I know the sketch didn't call for much of anything else, but it looked so plain, so I added some polka-dot chiffon ribbon and a little heart tag - which is also a s/binder die, and the sentiment is an old bella sentiment.

Be sure to stop over at bloggabella to see all the other entries for this week.  Leave a comment for a chance to win $10 in bella bucks.

Next week our challenge is a theme - You are so Sweet - I'm thinking this is along the Valentine line, but hey you can make it whatever you like as long as it is sweet!  To play along and a chance to win $20 in bella bucks, all you have to do is email Emily your entry by Thursday night - it's that simple!

Enjoy your weekend everyone, and thanks for the visit today.  

Saturday, January 15, 2011

Where there is Love..

there is Life! What a fabulous saying - it's from Verve!

I needed a couple of Valentine cards to take with me on Monday for my sale basket in Dresden,  so I pulled out Text Objects.


I started by cutting and embossing the heart on cream cardstock using  Spellbinders Nested Hearts. Leaving the die on I sponged some antique linen distress ink.  Next I stamped the verse. The DP paper I used for this card is from Cosmo Cricket called Circa 1934. This is such yummy paper! So for the layer behind the heart, I stamped repeatedly one of the verses from the same set. Used my Tim Holtz die to cut the layer under the red ric rac, then I ran the yellow paper through the cuttlebug using the heart embossing folder to give it a little texture. 
Finished up by adding some black rhinestones. Card measures 5 1/2 x 5 1/2.

Thanks for stopping by.

Thursday, January 13, 2011

Hearty Plant

It seems like the whole blogging world has been focusing on Valentine cards over the last few weeks, so thought it was my time to showcase something.

I chose to color up a Stamping Bella image called Hearty Plant for Lulu.


I stamped the image onto some of Bella's bestest paper and colored it with my Caran d'Ache pencils.  I matted this onto some deep burgundy glossy paper.  The DP paper is Basic Grey -  Olivia. For the white heart borders I used my EK Success border punch.  The turquoise ribbon was gathered by pulling a thread from one end of the ribbon and pulling- it gathers up very nicely, then just wrapped the ends around to the back side and tape down. Finished if off with glitter and used a glaze pen on the tiny hearts.


Don't forget about the Bellariffic challenge this friday.  It's a sketch challenge, hope you can join us.  Here is the sketch:
Thanks for stopping by.  See you on friday.