Belted Kingfisher

Belted Kingfisher
Showing posts with label Birthday. Show all posts

Sunday, April 23, 2023

Sunshine and smiles

 Hello!  For my card today, I am using SSS sunflower die The leaves are die cut from The Greetery - Botanicuts Rose die set.  All the pieces were cut from white cardstock, then I added SSS positively inks to all, spritzed with water and viola!

After this was all layered together, I cut my panels down using Gina K Master Layouts 2.


I then adhered the sunflower to the  panel, and flicked black paint onto it. I then adhered to the card base.

For the sentiment, this is an oldie from "Verve".  I still have so many of their stamp sets, just can't part with them.  

To finish off I added some coppery gold rhinestones and some flat  glitter drops from PFS.

I also made an exact replica of this card, but added Anniversary Wishes to the front instead, - a request from a friend who wanted an Anniversary Sunflower card!

Wishing you a wonderful!  Thank you for your visit.

Pauline

Saturday, December 3, 2022

Update & PFS floral card

 Hello, it's certainly has been a while since I've posted anything!

We have been renovating our kitchen, just Bill and I.  So with working full time, and then at night and weekends we have been working in the kitchen, which has left not much time for card making.  And even if I did have some free time, I just couldn't get into making cards.

We have gutted the kitchen right down to the studs. We've had to have an electrican come in before we insulated and drywalled, as there were only a couple of  outlets in the kitchen, so we have added more as well as some electrical units for pot lights.  Dry walling is done and painted, ceiling is done, and the electrician is coming back this week, to finish up. We haven't ordered the cupboards as of yet, we did a preliminary drawing of what we want and we visited IKEA, - love their cupboards.  So after Christmas we will take final measurements since the walls are all done before finalizing our cupboard order.  We also have to rip up the old linoleum flooring, level that before laying new. So still lots of work ahead of us,. we are in no rush, but at least the worst of it is completed.

So that is what has kept me busy.  And besides with having a small house and not a lot of extra room as we have no basement, a lot of boxes and stuff are in my craft room, which again doesn't leave much space for crafting.

I was just looking through me pictures of cards that I have made a while ago and realized there are some that I have not posted.

Today's card is one I made for my sister for her birthday last month.

Using Pinkfresh Studio hot foil plate, matching die and stencils as well as a Spellbinders embossing folder.

For my ink blending I used SSS Positively inks - love these inks, they blend wonderfully.


To finish off I used a premade sentiment that came in a pkg from Pinkfresh Studio some pearls and a rhinestone heart.  Very pleased on how this turned out.

Well that's it for me, need to get working on some Christmas cards.  See you soon!

Have a wonderful day.

Pauline

Friday, September 2, 2022

Tall Leaf Spray

 Hello, and Happy Friday.  

Today's card is one I made in which I was inspired by a card I saw on Pinterest.  I have had this leaf die for a while but just never got around to using it.  My card is done with SSS Etched Tall Leaf Spray die, oxide and spray stains, and gold foil embossing


I started by cutting out my leaf using canson watercolour 140lb paper.  I sprayed a variety of distress inks onto my glass mat, then dabbed my leaf into it, picking up various colours, leaving a few of them with the natural colour of the watercolour paper.  

I also spritzed down my slim line watercolour paper, and just spritzed a bit of distress ink and then spritzed with water again, held up right and side to side to have the inks flow across the card.

After everything was dried, I flicked on some gold and copper paints.

For my sentiment I gold foiled a Spellbinders sentiment and cut it out with an Altenew sentiment label die, which was then layered onto the rusty colour c/s.

To finish I added some Bronze mix jewels from Little Things by Lucy.  I also matched up a brown paper bag envelope to go with it.

My second card was basically cased from the one I saw on Pinterest.  I made this one first, and then I created my first card in a different colour.


Well that's it for me today. Happy Labour Day weekend! See you again real soon,

Pauline


Sunday, August 7, 2022

Spring Mix

Hi there!  Hope your weekend is going well.  It' been just to hot here to do anything.  Since Friday feels like 42C roughly 108F, and this is suppose to last until Tuesday, then it drops down into the 80's.  So needless to say, I have been staying indoors.  I got caught up on Season 4 Virgin River, can't wait until Season 5 which doesn't come out to July 2023. Any other Virgin River fans out there? Now we are watching the Rookie, it's so good.  And I have been knitting socks, reading  and dabbling into some card making as well.

For today's card I am  using the The Print Shop - Sporing Mix from The Greetery.  I just love Betsy's products, I just can't seem to get enough of her stuff.  I have another order coming from her latest release last week.  Anything floral or nature related, I'm in! lol

Okay, so the cool thing about this set is that it starts out with multi layering stencils and then you add the little details with the coordinating stamps. And the die is all one piece, just pop it over your stamped image and viola. I always start with the die cut, then I go ahead and do my stenciling.  I find it's easier to line up the stencils that way.  You could also just stencil the image onto your card front for a one layer card, no die cutting needed.


Once all the stenciling was done, I sponged some soft blue's and pinks for the background and then adhered my Spring Mix die cut on top.

I finished by adding some of The Greetery's - Flower Bits embellishments to the centers of the flowers. 

I chose not to add a sentiment to the front, that way it can be used for many occasions.

As always, love when you visit.  Enjoy the rest of your day!

Pauline


Saturday, July 30, 2022

Birthday Wishes

 Sorry, I haven't posted in a bit, having some health issues.  My RA seems to have flared up again, making my knees very painful to walk, and when you have that type of pain it's hard to concentrate, so needless to say  I have not been in the mood for much.  Feeling better yesterday and much better today.  It's one of those things where you just never know when a flare up can happen.  You just have to deal with it.  It's been about 4 years since my last flare up. Enough about that, lets get on with the cards.

Today, I have a couple of birthday cards to share, using the same stamps but changed up the colours and design.

All products are from Gina K - A little love kit. Love her kits, they come with stamps, dies, sentiments and stencils - so fun.  I also used a die from Pinkfresh Studio which I used on my first card for the gold foil leaves.

I used the stencil in my Misty to create the backgrounds. Once completed, I then used the rectangle stitch die from  Master Layouts 2 to cut out  a part of the stenciled background, leaving enough to die cut an extra floral and leaves.

I added some gold foiled leaves (die from Pinkfresh Studio) in behind my pop up floral.  Sentiment is also from Gina K - stamped in black versafine.  Added some SSS fine glitter to the centers of the flowers and also some pearls to finish off.


For my second card, basically done the same as the first, except I used some of the leaves that I stenciled on the background for behind the popped up floral.  I used the die cut 'love'' from the "A little hello" stamp kit and then stamped the sentiment below.

Glitter was added as well as pearls to finish off.


These were fun to do, I should of kept on creating with different colours, but I didn't. 

 That's it for me today.  Have a wonderful weekend!

Pauline


Monday, July 18, 2022

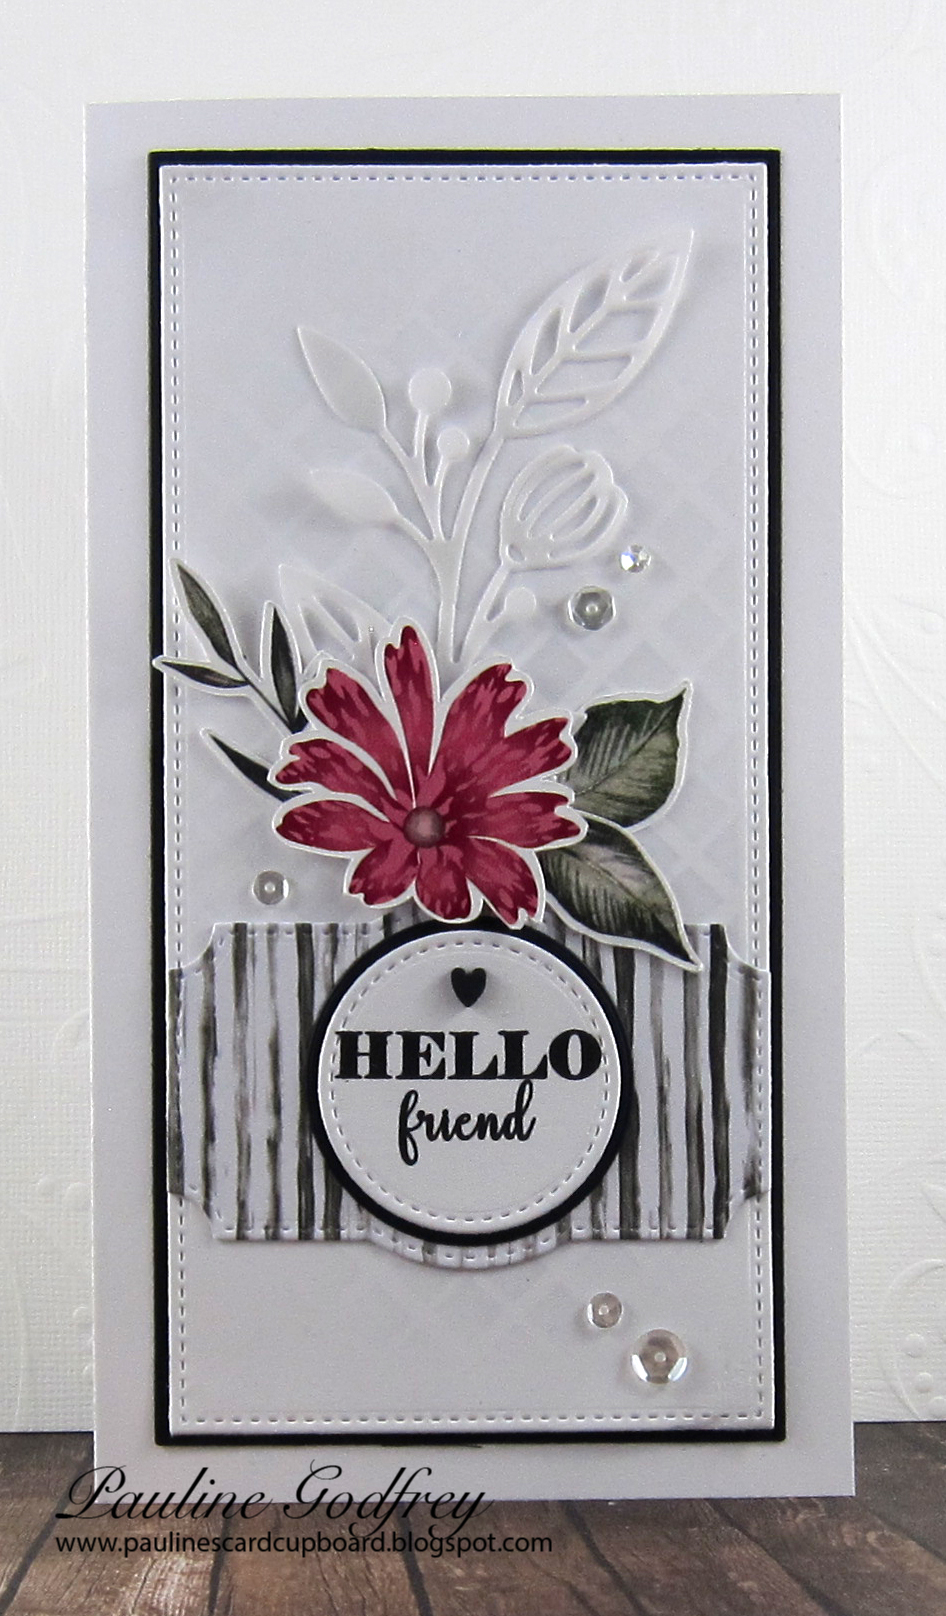
Two mini slimline cards

 Hello  friends! Today I have a couple of cards to share using some Gina K products. 

Both cards are mini-slimline.  Products used on these 2 cards are elements from the Wastercolouring Spring card kit and Master Layouts 7.

My first one, I used some Watercolour Floral Ephemera, the Botanical Duo dies, and  pieces from the Master Layouts 7. I started by sponging some light grey ink through one of the stencils that came with the kit to give a bit on interest on the background.  Paper behind the 'hello friend' is also from Gina K - watercolour floral pack.

The rest is pretty explanatory, so won't bore you with how I put this together. Added some sequins and a little black heart to finish this off.


For my second card, I used the Bodacious Blooms Stencil.  This is a 3 layer floral stencil as well as a plaid stencil, which I used the plaid in the card above. For this card, I just kept it simple. Used the master layout 7 for the slimline die.  For the sentiment I used one of my extra Spellbinders glimmer foil sentiments I had on hand. Finished off with some rhinestones.


That's it for me for today. As always, I appreciate your visits.  Have a wonderful day and keep well!

Pauline

Saturday, June 18, 2022

Gentle Blossom

 Hi there!  Today's card is one I made just to increase my stash bucket, which is pretty much depleted. I really need to get ahead of the game, much easier to pull a card out of your stash when you need one rather than have to make it.

Using products from Memory Box - Gentle Blossom Watercolour Floral, SSS Flickering Butterflies & SSS Positively saturated inks, Pinkfresh Studio - Essentials Mini Slimline dies and Penny Black - Not older, better (sentiment)


I started with some heavy weight white card stock and cut it down to a mini slimline using PinkFresh Studio die.

I then sponged some inks from yellow to pink over lapping in the middle to get the pinky colour, then spritzed with a bit of water and used a piece of paper towel to soak the excess as I didn't want large water spots.

Next, cut the die out of the white c/s, then sponged the same colours on the blossom. I stamped the sentiment first before adhere the blossom to make sure I had enough room.  Added the butterflies which were cut from gold mirror cardstock.

I was going to add some bling, but decided to leave as is.

I really love how this turned out.  I want to try some more but make the blossom in different colours.

Thanks for stopping by today.  Enjoy the rest of your day. Beautiful day here in SW Ontario only a high of 64F, but sunny and very windy.  I'll take this over the 116F days last week!

Keep well,

Pauline


Sunday, June 12, 2022

Books & Flowers

Hello!

Today I have a card to share in which I made for my  Daughter-In-Law Anna.  She is both beautiful inside and out, we are so blessed to have her in our family!

I created a Slimline card for this as the image is large.  Stamp is from StudioLight - Books & Flowers.

When I saw this image I knew I had to have it for Anna's birthday card, just so fitting as she is such an avid reader.

I stamped the image onto some Canson 140lb watercolour paper.  I then scribbled some Zig markers onto my palette and picked up the ink with a wet paintbrush.  Continued this until I was happy with the results. 


I then used Pinkfresh Studio slim line dies to cut out the image, as well as the aqua background layer, which is the same size as a Slimline card base.

I wasn't sure if I was going to add a sentiment or not, as the image is quite busy... but I had this large white space, which I just happened to get a smudge, so I needed to cover it up.  I pulled out The Greetery - sentiment suite - Birthday, and used one of the tiny birthday greetings, and cut it out with a flag banner die, added a tiny silk ribbon to the top of the banner.

Finished off with wink of stella clear brush pen and added this to the flowers, also added some small pearls.

It's a beautiful day here in SW Ontario this early morning (7:30 am), sunny and very breezy, not too hot yet, so think I will head outdoors and do some yard work.

Thank you for stopping by today, whatever you are up to today - enjoy!

Pauline


Sunday, June 5, 2022

Glimmer birthday card

 Hi there!  Today's card is one I made for my friend Carla's birthday.

I used Spellbinders Glimmer of the Month December - Botanical Crest


I foiled the botanical crest using gold foil and my glimmer hot foil system onto some MFT Sno Cone cardstock.  I then used the inner die to cut out the center. I also glimmered the sentiment which is from SB Yana's Sentiments. Not sure what I was thinking when I did the sentiment but it should of been a bit lower, hence I added the heart rhinestone to fill the space.

I cut some flowers from yellow and pink c/s from the same botanical set and adhered them around the wreath.

For the bottom floral I used Spellbinders Mini Blooms and Sprigs.

As always, I appreciate your visit.  Enjoy the rest of your day.

Pauline

Monday, May 16, 2022

Farm Fresh Birthday Wishes

Good morning everyone. A gloomy rainy day today here in SW Ontario, but much needed.  Ground is so dry, we have huge cracks in the ground in our backyard.

Today's card was made with pieces I already had  in my basket of unfinished pieces.

The vase of flowers is from Simon Says Stamps - Mandy's Flowers, coloured using copic markers, then fussy cut out. The background layer was sprayed with a light peach colour (sorry made this over a year ago, so don't recall the colour of spray). I then used a stencil and applied Nuvo paste on top. 


The coral frame was cut using IO - DIE242-YY, cut twice and adhered together.

Cut a tiny tag from Spellbinders and stamped the birthday wishes from PTI in black versafine. Added some foam squares behind the flowers and tag and popped it up along the side of the frame.  Added some clear sequins to finish off.

As always, I appreciate your visit.  Wishing you a wonderful day!

Pauline

Monday, November 22, 2021

Enchanted Meadow.

 Hi!  Hope you had a good weekend.  Mine was busy, and spent most of the day Sunday working on my Christmas card orders.  I still haven't gotten around to taking pictures of any new ones yet, but I do have one from a while ago to share.

This one is using Pinkfresh Studio Enchanted Meadow.  The entire card was done using stencils.


The floral meadow was done using a variety of Pinkfresh Studio inks.  Once done, I then layered the argyle stencil and added glitter paste through the stencil.  Once dry I tied some twine around it and added a little take with 'happy birthday', and also included a little pink heart from Trinity Stamps.  Added a few pearls in different colours as well, then adhered to a blue cardstock.

A quick and easy card.  

Thanks for stopping by today, have a wonderful day!

Pauline


Monday, June 21, 2021

Miss Your Smile - slimline

 Hi!  Hope everyone had a great weekend.  Weather has been so hot here, but looks like tomorrow and Wednesday we have a little reprieve before it heats up again. 

Today's card is a slim line using Pinkfresh Studio - Miss Your Smile stencils.  I am so hooked on stencils lately, it makes for speedy and beautiful cards. I used a variety of colours to create this all being Pinkfresh Studio inks.


The Happy Birthday is also a Hot Foil plate from Pinkfresh with a matching die set.  All sentiment words are on one glimmer plate, so you just need to run it through your Glimmer machine and the die is all in one sheet as well, so one pass through your Spellbinder Platinum I have a variety of sentiments at once.  

To finish off I added some pearls and wink of stella clear glitter pen.

I appreciate you stopping by for a visit.  Hope you have a fabulous day!

Pauline


Sunday, June 6, 2021

For someone Special

 Hi, hope you are all doing well.  I was going to post this card last week, but had to wait until our daughter-in-law received her birthday card, as I didn't want to ruin her surprise.

I had the floral piece stamped out a while ago, as I had stamped out several of these in a variety of colours to have on hand.


Stamps and dies are from Pinkfresh Studio.  For the frame, once cut I sponged some speckled egg onto it. (I think that's what I used).  I popped the frame up from the background piece, and also added some foam squares behind the flowers so everything was level with the frame.  

For the sentiment, I used my Spellbinder Hot Glimmer machine and glimmer dies, using foil.

To finish off I added a crystal heart and some tiny pearls.  Added SSS unicorn dust glitter to the flowers.

It is very hot here, started on Friday and will continue all next week. Heat warnings are out.  Currently as I type this it feels like 94F (34C).

Thank you for stopping by, keep well,

Pauline

Monday, May 31, 2021

Slimline Birthday

 Hello everyone I'm back! You probably wondered where I've been?  Well, lets just say, life has been busy, work has been hectic, and with that no blog posts.  I basically lost my mojo back end of march early April so card making kind of took a back burner.   I had a friend reach out and ordered 20 cards, so that kind of pushed me to continue to make cards but I struggled with it. I finally have her order done after 2 months.  So hopefully now that I have that completed, and pictures taken I will be posting more regularly now.

Today's card is a birthday card I made using Spellbinders die of the month for April. This is a slimline die set, which contains 4 slimline dies and several flower and leaf dies.


I started with SU Bermuda Bay c/s.  After all the pieces were cut, I added some foam tape for the top layer, but before that I embossed the 'happy birthday' using white embossing powder.

For the flower and leaves, I used scraps from my scrap bin.  

To finished I added some tiny white pearls to the centers of the flowers and scattered some rhinestones across the front.

Well that is it for today.

I hope you are all keeping well.  I'll be back again soon,

Take care and have a wonderful day.  

Pauline


Tuesday, March 23, 2021

Sending Springtime smiles

Hello!  I'm back today to share another springtime card using products from PinkFresh Studio.

This is the same stencil set that I used in my last post - the  Daisy Wreath Stencil  and matching die, along with Diagonal Stitched Circles dies and Simply Diamonds die.  I also used a background stamp - Floral Diamond.


I started by embossing the floral diamond background stamp onto some white c/s using white embossing powder. I then sponged the entire background using PF inks - Grassy Knoll and Fresh Pear, not too heavily.

My florals were done with PF inks as well, I used inks from the green set - Over the Hills as well as inks from Rise and Shine set.  

Using white c/s I cut out the diamond background using the Simply Diamond die, as well as one of circles from Diagonal Stitched circle die.  I figured out where I wanted the sentiment by arranging the floral pieces, then embossed the sentiment in gold - sentiment is from PTI.

I then layered everything together, added some glitter to the flowers using SSS unicorn glitter and my quickie glue pen.  Added some pearls and rhinestones to finish this off.

Love the fresh springtime feeling to this card. 

Thanks for stopping by today, always appreciate your visit. Stay healthy, keep well, till next time.....

Pauline


Monday, February 1, 2021

Balloon Bouquet

 Hello.  I'm slowly getting back into the groove of card making. Sorry it's taking so long.  I pulled out some stamp and die sets from The Greetery for my cards today.  I'm trying to replenish my stash basket as it is pretty much depleted.

Stamp sets I used are :  Balloon Bouquet and matching die set as well the  Birthday Blooms and matching die set.  Also used the Stitched cloud dies.

The large balloons are layering stamps, which really make the flowers look so real.  I used distress oxide inks for these. Once the large balloons were done, I sprayed some clear glitter spray for added sparkle.  The larger balloon on each are popped up with some fun foam behind.


For the sentiments, I used the same inks I used in the card and just stamped in two colours for a gradation look.


To finish off I added some sequins and enamel dots.

As always, thanks for taking to the time to stop by.  Keep well, stay safe,

Pauline

Thursday, December 10, 2020

Refreshing Florals

 Hello everyone! I hope you are all doing well. I was going through my cards that I have not shared and I only have a couple left.  I really need to get on the bank wagon and get some 'new' cards produced, rather than re-make older ones.  But most times for my orders  people ask for ones that I have previously made, so don't want to bore you with those.

Anyhoo, a while back I found some water colour paper at Micheals (cheap price and cheap paper!).  Sometimes you just never know how the paper will work.  Well I  wasn't overly impressed by it.  It is rougher than normal, but quite heavy. I also found that the water colours DO NOT move on this... grrrr.

I started by smooshing the background, which I really liked. I stamped the floral vase from PB Refreshing set using black archival ink.


Painting the image was a struggle, as like I mentioned the paints soaked up so fast, it was difficult to make them blend, but I did my bet.

Once coloured, I cut it out using MFT cross stitch rectangle dies, then added a bit of splatter.

I used Nuvo clear glitter pen for the flowers, I took a close up for you to see the shimmer below.


For the sentiment I used one of Simon Says sentiment strips and foiled it using some rose gold foil.  It is so pretty in real. To finish I added some crystals.

Despite the struggle I had with painting this, I really like how it turned out.  I might have to persevere and make another as this one was sent out in one of my card orders. Sad thing is I don't even remember what inks I used to colour with.  Oh memory is a wonderful thing when it works!

I'm off until Tuesday now, my plan is to work on some new cards.  Thank you so much for visiting today.

Hugs and take care,

Pauline


Friday, September 18, 2020

Healing Bouquet

Today is such a beautiful fall day, not only do I have the day off, but temperatures are 59F as I write this post, sun is shining, breezy, couldn't ask for a more perfect day!  Had to visit the dentist this morning as a piece of my side molar tooth broke off last week. M outh is still slightly frozen, you know it's really hard to drink a coffee with a frozen mouth!  Spent some time outside after my appt doing some weeding, I noticed leaves are starting to change.  I love this time of year!

When I saw that Power Poppy released a couple of new digi images a couple of weeks ago, I had to scoop them up.  This is one of them called Healing Bouquet.  But I decided to use it for a birthday card.


I used my Poloychromos and gamsol for colouring.  I then cut it out using an MFT scallop rectangle die, then layered it onto some soft pink, in real it matches the lotus blossom colour.

I added glitter and pearls rhinestones to finish this off.

I'm using up some more of my vacation days so I'm off until Wed! whoot whoot!!!

I hope you all have a wonderful weekend. Keep safe stay healthy.  

Pauline


Friday, September 4, 2020

Slim line Happy Birthday

 Well, I'm down to may last card that I haven't shared with you yet.  I guess I better get busy making cards this weekend. 

The big rage right now is slim line cards, so I decided to make one.  I had lots of leftover Pinwheels I decided they would work well on this type of card.  The pinwheels stamps and die cuts are by The Greetery.


 Once I had an idea of how I wanted them laid out on the card, I used distress oxide inks in the same colour family and sponged lightly onto some white c/s.  Spritzed the background with Sheer shimmer craft spray- love the shimmer.

I adhered the pinwheels across the card some flat some popped up, then stamped my sentiment using black versafine ink.

Added some sequins and stars to finish this off.

 I'm off till Tuesday, looking forward to a nice long weekend.  Hoping to get out and do some bird photography as fall migration has started.  Bill and I went out last Sunday morning and saw quite a few.  Haven't had a chance to work on any pictures yet, but when I do I will share.

Enjoy your weekend, keep well, hugs,

Pauline


Friday, August 28, 2020

Dear Friend

Well here we are at the end of another week! It's hard to believe next week is September. It's a raining day here to day, been raining most of the night. 

For my card today I'm using a stamp from  Penny Black  - At Grace.


I started by putting my stamp in my Misti, adding distress oxide inks directly to the rubber using a finger dauber, this way you get into those time spots.  I stamped it and didn't like it, so I inked it up again, and this time I stamped it off lightly onto a piece of copy paper, then added a new piece of white c/s back into my Misti and stamped, and it was perfect.  the first time it was too dark, but second impression just perfect.  I then added details but using fabre castell polychromos pencils. Love it!

I stamped the Dear Friend using black versafine.  This is from Ink to Paper (Papertrey Ink) Framing Floral set.  Love the big font and the two different scrips.

Trimmed the image to be a bit narrower, then  added a thin layer of black cardstock down the right and thin added some designer paper along the edge.  

Finished up with some twine and some pearls from Studio Katia . I added a bit of glitter to the flowers as well.

Well that's it for me folks.  Thank you for stopping by today, and have yourself a fantastic weekend! Hugs to all,

Pauline