Belted Kingfisher

Belted Kingfisher

Thursday, December 26, 2019

Boxing Day Birthday

Hello everyone! I hope everyone had a wonderful Christmas. Not only is today Boxing Day, but it is my birthday!!! Yay!!!!! I guess that means I'm another year older, Yikes!! LOL And yes I do get presents both days, Christmas and birthday.  My Mom always made sure to keep my birthday separate, as it should be right?

I don't have a birthday card to share today, but I do have a couple of Christmas cards I made last week, which I'm going to make a few more of the same and put these towards Christmas 2020.

Now the background idea was not mine, I saw these beautiful cards displayed over at The Foiled Fox, and right away I knew I had to make these backgrounds myself. I did 3 different coloured backgrounds, but the pink one, I messed it up so it went in the garbage.  But, I have the other 2 to share with you today.


First up is the blue - all done with distress oxide inks and MFT drifts and hills stencil.  Inks used were: stormy sky, peacock feathers, salty ocean, evergreen bough and chipped sapphire. Start by laying the stencil towards one side about 1/2 inch in from the edge, sponge the ink, then rotate the stencil to use one of the  another sides, and repeat until your entire cardstock is covered.  I also used canson 140lb watercolour paper for this.  I then spritzed the background with Imagine Sheer shimmer craft spray sparkle.  It leaves a beautiful sparkly background.  Not sure how well you can see it on the blue card, but think it's better on the green card to see.
I then cut out of gold mirri cardstock the tree.  The tree is from Inlovearts. I added a clear crystal rhinestone for the star and a couple of blue sequins on the tree.


For my second card again I used distress oxide inks and stencil - cracked pistachio, evergreen bough, pine needles, ice spruce, peacock feathers and twisted citron.
The tree die used is from Penny Black - Xmas tree border # 51-454  I cut it from two different green cardstocks, then offset them.  I also cut the front green piece using an MFT hill die, then stamped a sentiment from SSS, added some foam tape behind, then added chunky glitter along the top of the hill.  The tree die also has tiny star dies, so cut them out of the same greens and then adhered them here and there.


The pink background was very pretty, but when I went to emboss and branch on it I didn't like the way it turned out, so I will give the pink another try.

Enjoy the rest of your Holidays, thanks for stopping by.

Pauline

Tuesday, December 24, 2019

Merry Christmas..

Well cards are all mailed, presents all wrapped, house is cleaned and all the food is prepared as we are celebrating Christmas today with my family.  Mark, Anna and boys are on their way down. 


I wish everyone of you a safe and Happy Holiday.  Thank you for supporting me over the year, I truly appreciate your friendship.  May this Christmas season fill your home with joy, your heart with love and your life with laughter.  Looking forward to see what 2020 brings.  Warmest wishes......

Pauline

Monday, December 16, 2019

Peace, Prayers & Blessings

I hope you all had a good weekend.  Yesterday, Bill and I celebrated our 40th Wedding Anniversary - boy how the years sure fly! 

I mentioned a few weeks ago that one of my card orders consisted of sympathy cards.  Today I have 2 more to share with you.

My first card is using Alexandra Renke papers and washi tape.  I cut one of the birds using a circle die, then layered this onto another piece of white cardstock cut using Altenew Fine Frames Circle Dies. I like that this die allows the circles to stay together, or you can peel them apart and use them separately.

I also cut an Aliexpress floral die to lay behind the raised circle. I embossed the sentiment (PTI) using PSX detail platinum.


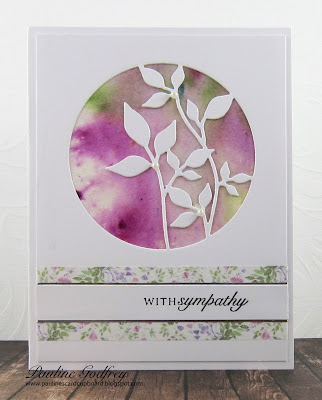
For my second card, I had some paper already made a while ago using Magenta Nuance powders. Every now and again I just decide to play and create different colour combo backgrounds to use at a later time.

I pulled out Simon Says Circle of Leaves die and cut this from white c/s.  I also added some washi tape (Aliexpress) along the bottom, then adhered my front panel to the coloured background. Sentiment is from PTI as well.  I added a couple of pieces of silver peel offs below and above the sentiment.  Pearls were added on the base of 3 leaves.


I hope I was able to inspire you today.  Thanks so much for visiting.  Have a happy day!

Pauline

Thursday, December 12, 2019

Purple Iris


So excited for today!  After our company Christmas lunch, I am officially on vacation until Jan 6, 2020!! Just over 3 weeks off, can't wait.

Today's card is one I made for one of my orders.  I was going through my bucket of partial made cards, and came across this image already water coloured some time ago.  I wasn't fond of it after I coloured it, so just tossed it into my bucket.

I was running out of time to get this order completed, so when I came across this I knew I needed to make this work somehow.  Not sure why I didn't like it before, but it seem to pass the test once I had it completed.


This is a Penny Black image, which was gold embossed onto some Canson watercolour paper.  I used my Zigs to colour.

I added some gold mirri paper at the top and bottom corner to accent the gold in the image.  I added this to a purple card base, added some pearls to finish off.  I also embossed a gold sentiment towards the bottom.

I hope you are having a great day!

Pauline

Monday, December 9, 2019

Peace

Hello everyone!  I'm a happy camper as I have all my Christmas card orders completed, and all my Christmas cards in the mail as of last week! Woohoot!!!! Such a good feeling. I massed produced some of my cards that I shared in Oct & Nov which help speed things up, as well as I had a few left from last year that I made.

Today's card is one I made using Memory Box dies - Ruffled Poinsettia #94296 and Petite Leaf Frame #94318.  The 'peace' is from IO # DIE226-A.


I die cut the poinsettia and frame from white linen c/s.  I layered it onto some smooth white c/s, then onto some gold mirri c/s.  Love the look between the two different whites.

The 'peace' was also cut 3 times - 2 from white and then from the gold mirri, and adhered together.
I popped the poinsettia up so I could tuck the leaves underneath.  I then used a Nuvo clear glitter pen and coloured the poinsettia to add sparkle, so pretty in real.

I adhered the Peace along the bottom and then added some prills to the center of the poinsettia.

I made 5 of these!

Thanks for stopping by, have yourself a wonderful day!

Pauline

Thursday, December 5, 2019

With Sympathy x 2


Hello.  Well I finally finished all my Christmas card orders as well as all my cards for my mailout.  I have 3 birthdays in December to make cards for, so that is next on my list.

Today, I'm sharing a couple of sympathy cards I made for one of my orders.

These were a quick make.  I used images from Alexandra Renke - just love her papers.  I cut out the images and layered them onto silver card stock.

I used some teal Bazzill card stock and used a stitched rectangle die to cut it out.  I then used Eucalyptus washi tape from Alexandra Renke (which goes with the images), and added a piece of this to the bottom of the teal c/s.

For my first card I used a die from Simon Says Stamps - Ecualyptus leaves


This one uses  a die from Simon Says Stamps - Cottage stems which seems to be discontinued as I couldn't find it on their website.


That's it for today. Have a wonderful day!

Pauline

Sunday, December 1, 2019

Nourish & Flourish


Sorry I haven't posted in almost a week.  I've been busy with another card order which I'm almost done. 14 cards this time, and the good thing about it is that I am just re-making cards that I have already posted, so this makes the process so much faster, as I just need to copy from my first card.

Can you believe that it is Dec 1 already! Yikes, still have Christmas cards to make, how about you?

Before I started this card order and right after I finished the last 19 cards, I made this one.  This is a digital image from Gracielliedesign called Nourish & Flourish. I love digitals for two reasons, does not take up space (only on your hard drive) and you can resize it to your preference.


I used copics to colour and believe it or not I actually remembered to write down the numbers this time!

This was pretty straight forward, so I will list the supplies below.

Supplies:
Image - digitial from Gracielliedesign - Nourish & Flourish
ink - printer, Copics - R30, R32, R35, R37, Y35, YG00, YG03, G97, G99, BG0000, BG10, C00, C01, C02
Paper - Bazzill Basics Paper pack - Vintage Lace, cougar white, Bazzill - kind of a sage green
Die - Aliexpress
Misc - silk ribbon, sequins, Nuvo glitter gloss aqua shimmer

Okay back to finishing up this order.  So glad you stopped by today.  Have yourself a wonderful day!

Pauline