Belted Kingfisher

Belted Kingfisher
Showing posts with label Valentines. Show all posts

Wednesday, March 8, 2023

Hello Friend

 Hello friends, and happy Wednesday.  Wednesday and Friday's are my favourite days of the week as I get to work from home on those days.  It's really nice they still offer this work arrangement for our company.

I was going through my cards that I had made over the last month or so, and realized I have anumber of cards that I have not posted yet.

This one I made for a card order - for Valentines for one of her friends.

I already had parts of this die cut and stamped (just sitting my to use bin), so it was just a matter of putting it all together


I used Spellbinders 3D embossing folder- Leafy for the card base layer, the bow is from Memory Box and the floral spray, banner die is from The Greetery.

Finished off with some tiny gemstones and rhinestone heart and a simple sentiment - hello friend.

What inspired my first card was this card that I think I saw on Instagram, so I decided to basically case and added my own touch on it.


Same embossing folder as the first card as well as the banner die, the Botanicuts Rose die is from The Greetery as well, which I already had this in my 'to use bucket' as well.  The lace die cut along the top and the bow  is from PTI.

I always feel bad when I 'case' a card, but sometimes I find you need this to jump start your mojo when you have lost it. How do you feel about casing a card?

I wish you all a fabulous day, and appreciate your visit.

Pauline


Monday, January 24, 2022

Sending Love

 Hello, hope everyone is doing well.  I meant to post this last week, but it didn't happen so posting today.  I have a standing order with a friend, and although she didn't reach out to me yet to ask(which she normally does as a reminder) for some Valentine cards & St Patrick, I was being pro-active, made them and popped them in the mail to her.  She should get them this week, which will be a nice surprise for her, because normally I run so late with getting her orders done, not because I don't want to, just because sometimes you don't have the time.

But regardless, I will share a couple I made for now.

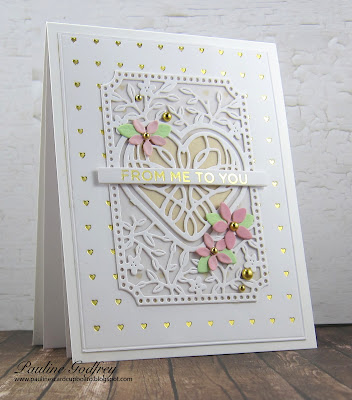
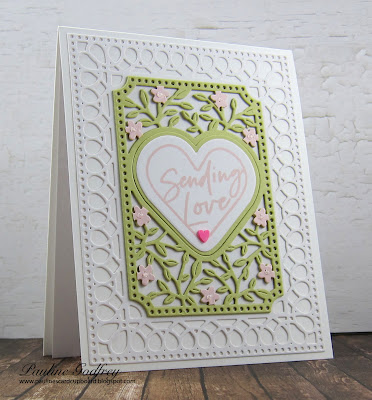
Both cards are using the same dies from Spellbinders January Dies of the month club (large & small dies)  from 2021.  I ordered this back last January when it was released, but by the time it got to Canada it was already into Feb, which was too late.  So I used this for this year.

The gold heart is a hot foil glimmer plate called Heart Grid.  Love how this foiled using gold foil!

After I die cut the center piece, I laid a piece of Vellum behind it, then adhered to the card front.  The flowers and leaves were die cut as well, then added them to the front along with some gold pearls.  I gold foiled the sentiment as well, added some foam tape and popped it up.  I also added a die cut heart in gold and layered that behind the vellum, in order to make the heart stand out from the front side.


2nd, card, using the same small die of the month and the stamp sent of the month.  Cut the frame from white, then cut the center frame from green and pink.  I cut the little pink flowers out and glued them to the green layer where the flowers were.  The center 'sending love' was stamped in a light pink, due cut then layered.  
I added some Nuvo drops to the centers of the flowers, and little pink heart.


I hope I inspired you today.  Thank you for stopping by, always appreciate your visits.  
Well I'm off today, going over to visit a good friend for coffee and conversation!  Enjoy your day.

Calling for another dump of snow today, 5 - 10 cm! Me no like, but it does bring the backyard birds around, which I love, cardinals, blue jays, dark eyed juncos, house finch, gold finches, house sparrows, nut hatch, woodpeckers, black capped chickadee and of course or not so welcomed squirrels (4-6 of them depending on the day!).  

Pauline

Friday, February 12, 2021

Spellbinders Valentine cards

Happy Friday! I have a couple more Valentine cards to share today.  Both cards are using the Spellbinders  small, large and glimmer kits of the month for January.

My first card (although it looks crooked, but it's not in real life, must of been the angle of my camera) is using the larger die of the month.  I cut it from gold mirror cardstock and cut off the ends on each side (this die is a slimline size).  I used my glimmer hot foiling machine and dies for the sentiment and the heart in the center.

The set also comes with some flower and leaf dies, which I cut form green and pink cardstock, sponged some distress inks on them for added interest.  Behind the gold centerpiece I adhered some vellum, it gives it that frosty look.  For my card base I used my score buddy and added score lines.

To finish off I added some small gold pearls.


For my second card, non traditional Valentine colours - a request from my co-worker for his girlfriend who's favourite colour is purple.

Again, I used the small die of the month for this one.  I cut the outer frame from white, and the inner frame for purple and also from silver mirror c/s.  I adhered the purple to the silver just offset just a pinch. Used my hot glimmer machine for the foiling on the sentiment and the center heart. Die cut some flowers and greenery and added to the bottom corner. 

To finish off I added some pearls and rhinestones from Studio Katia.


Well that's it for me for today.  I hope everyone has a wonderful Valentine's day on Sunday.  We are still in lock down here until the 16th.  Still very cold,  looks like it will continue into next week.  How many more days till spring? !!

Oh I was so surprised yesterday, as I was working away in my craft room (that's where I have my work station set up for work) I was looking out my window and saw a different bird.  It was a Common Redpoll.  We have never seen one in our backyard, they never seem to be this far south in Ontario.  Grabbed my camera did a quick picture from the back door before he flew off.  Such a pretty bird.  Anyway just had to share that with you.

Take care, see you back here next week.  

Pauline


Friday, January 22, 2021

With Love

 Hello everyone! I meant to post this to be loaded up this morning, but I think I lost a day somewhere.  I tell you when you work from home, each day just rolls into the other. I've been totally off my game this week for some reason.

Well, as promised here is the other Valentine card I made for my friend.  I got the stenciling idea from Jennifer McGuire - love her videos, always packed with so much information.  Stencil is from SSS.  I started with some Fog Grey c/s (SSS) and used a light grey ink, I think it was from Altenew.  I then trimmed down the sides and lined it up to where I wanted it on the card base.  I then laid the stencil over top of the fog grey, and then carefully removed the grey c/s and then sponged the stencil onto the pink using PTI peony pink ink and c/s.


I cut the hearts (Aliexpress) from 3 different shades of pink/coral/red.  The heart flourish is from Penny Black (love is growing #51-181) - had it forever, and cut this out of some fine red glitter paper.  Stamped the sentiment (PTI - Ink to Paper) with some black versafine.  I added the 4 red hearts, these were from the Penny Black heart flourish die.

I was going to add some sequins but decided to keep it simple.

Well that's it for me for today.  Hope you are all doing well, and thanks for stopping by.  Have a wonderful weekend, see you real soon.

Hugs,

Pauline


Monday, January 20, 2020

Be Mine

Hope everyone had a good weekend.  We had a major storm on Saturday for most of the day, so we didn't venture too far from the house, other than to shovel us out!

I actually made a few cards as well.  Slowly getting back at it. I have a few Valentine orders to do, so thought I best get tackling those. 

I'm using a die from Ink to Paper.  I love this background called On the Border - From the Heart frame die.
There are 3 pieces to this die - the main leafy flourish, the heart and then the leafy heart.


I cut the frame using white c/s, then cut another piece using the just the center heart, which was cut from gold shiny c/s, it is actually a brushed gold, really pretty in real. 

For the background I started with a piece of Bristol watercolour paper 140 lb, then sponged distress oxide spun sugar, worn lipstick and abandon coral.  I then spritzed with some water, the sprayed it with Sheer shimmer craft spray - sparkle, and also flicked on some gold.

I embossed the sentiment (Ink to Paper - Just sentiments- Valentines) using gold embossing powder onto some white c/s.  To cut the sentiment and the banner flag strip behind I used some dies from The Greetery.

Once everything was together I added some Nuvo crystal gems for some sparkle!

Thanks for stopping by,  have a happy day!

Pauline


Monday, January 14, 2019

Va Va Valentine #1

Hello everyone.  I hope you had a good weekend.  It was busy all weekend, so never had a chance to make any cards - I always try to make at least one card on the weekend. Bill and I went out to find hawks and owls.  We did manage to find some hawks, but no owls yet! I'll share some pictures once I get them ready.

Since Valentines is only a month away, I pulled out some of my digital images from Power Poppy - Va Va Valentines to get some cards made up.

These images are so fast to colour, and love the humor/image. So fun.


I coloured them up with my newly received Christmas gift - Faber-Castell Polychromos pencils. Oh boy, they colour and blend wonderfully! I've been wanting a set of these for quite some time, as my prisma's are well used, old, and they keep breaking.

The rest is pretty straight forward, I will list all the supplies below.

Thanks for taking the time to stop by today.  Have yourself a fabulous day!

Supplies:
Image - Power Poppy digital - Va Va Valentine
Die - MFT - Inside & out stitched round rectangle, Spellbinder - heart die, PTI - heart border, Memory Box - mini heart collection
Paper - MME - Stella Rose - Mabel papers, cougar white 110 lb
Misc - Polychromos pencils, enamel dots, wink of stella - for the hearts on the image

Pauline

Monday, February 6, 2017

You spice up my life

Happy Monday!  It's a gorgeous day here in SW Ontario - sunny, cool feels like 27F, but a nice treat from a cold weekend that felt like 10F.

I've always wanted this set from MFT and had a chance to purchase it end of last year when they had their Wednesday sale going on.  The set is called "recipe for happiness'.  I made this for my basket at work for Valentines.


I sponged MFT grout gray ink through my brick stencil onto white cardstock.  I then used die-namics blueprints #15 to cut it out.

I used the matching die set to cut out the 'chef' and then used copics to colour. I also cut out a few spice bottles and coloured as well.

Paper is from my scrap basket so not sure of the designer.  I embossed the sentiment using white embossing powder onto a piece of black c/s cut using a flag end die  MFT die-namics blueprints 27.

To finish off I added some enamel dots.

I hope your having a wonderful day.  Thanks for stopping by.

Pauline

Monday, January 12, 2015

Where there is love....

Happy Monday everyone.  Well this is a happy monday for me, because I have the day off.  No plans, other than hopefully work on some more cards.

Yesterday afternoon I pulled out me new Verve set - More than love.  I love the sentiments that come with this set.  After looking through some of my 6x6 paper pads I decided to go the the Prima - Tea thyme.  So with lots of die cutting, this is what I came up with.


I began by cutting out a tag shape by using a Verve die.  I placed the die on the paper to incorporate some of the flowers on one side.  I then stamped the sentiment using black versafine.  After playing around with several dies and about an hour of time I finally made a decision on how to finish this.

I cut a piece of vellum using Marvelous Squares.  I adhered this to the middle of my base designer paper.  Next I used a die from Anna Griffin, then used labels #6 for the green layer, then sponged the edges with gathered twigs.

The Eiffel Tower was cut from a piece of brownish/grey c/s.  I wanted something a little more sturdy, so I cut it again using some chip board.  I coloured the chipboard by sponging some distress gathered twigs.  I then glued the c/s to the chipboard, then sponged some gathered twigs around the edges.

To finish off I added a piece of tattered pearl lace along the top. Added some silk ribbon to the tag along with a little bow made with my bow maker, then added dimensionals to the back of the tag to give it some height off of the card. I cut one of the flourishes from - SB corners and accents and adhered that to the right side of the green layer. I then cut the flourish again from some bazzill quartz c/s and then just cut the flourish part off and adhered the heart flower part over the green flourish then added a pearls.

Supplies:
Stamps - Verve - More than love
Dies - MFT - Eiffel tower, Spellbinders - labels 6, corners and accents, marvelous squares, Anna Griffin - Flourish Medallion
Paper - Prima - Tea Thyme, bazzill quartz, chipboard, vellum, brown/grey c/s
Ink - black versafine, distress ink - gathered twigs
Misc - silk ribbon, pearls, tattered lace w/pearls, bow maker, SU dimensionals

Thanks for stopping by.  Take care and have a  good week.

Pauline


Friday, January 13, 2012

First bellariffic challenge of 2012

Hey, happy Friday everyone! Today marks our first bellariffic friday challenge for 2012! And we start this years off with an awesome sketch, done by Ebruabella!!

As soon as we were shown the sketch I knew I wanted to put a Huggabugg image in that circle.  Question was what image was I going to use.  So with Valentine's Day creeping up on us fast I pulled out
Lovey Huggabugg. These little guys are just so adorable!


I first stamped her on bella's bestest paper and then coloured her up in the yummy pinky/red colours using prismacolour pencils. The DP is by MME called Love Me.  I just love all the paper in this pack! For the sentiment part of the sketch, I used a s/binder heart.  I wasn't going to put anything else on the heart, but as I was putting the card together, I noticed a small piece of paper that had the words 'love' across it - it was off of the back side of the striped piece.  So guess where I put that! Yep you got it - glue it onto the heart - a perfect little sentiment!.  I also used a couple of circle dies along with the lacy circle die.  Finished off with some stitching, and I applied some glitter ritz to the wings.

Be sure to hop over to Bloggabella today, and leave a comment on all of the wonderful submissions.  You have a chance to win some bella bucks if you do.

Do you have a favourite Bella image?  Well, if so, get it coloured up because next weeks challenge is "ink up your favourite image'. Email your card to Emily by thursday night for it to appear on Bloggabella.

If you haven't been following Bloggabella lately, there is another release coming out on Tuesday!
Emily says it's bestest and biggest yet!! You can follow her on Twitter for some sneak peaks.

Well, that's it for today, have a great weekend!

Friday, February 4, 2011

Love is in the air...

Yeah! Friday again! It's been a very long week for me for some reason, so I'm glad it's finally friday.

This weeks challenge theme was Valentines. With that in mind I decided to color up a chi chi image called Eloise and her Heart Basket.


I stamped Eloise on to bella's bestest paper with black memento and colored her with my Caran d'ache pencils and blended with gamsol (OMS).  After cutting her out I left the die in place and sponged some versamagic wheat ink around the edge then went over it with some pixie pink.  I based my coloring from the colors in this piece of paper from K & Company- Wild Raspberry collection - yes this is the same paper collection I used on yesterdays card.  It was still sitting here on my desk so leafed through and found this piece.
I added a piece of may's art lace ribbon across the middle. Isn't this pretty lace- almost didn't want to cut into it, but I did!
Finished up with some glitter on Eloise's dress.

Next weeks challenge is a circle card. If you would like to play along with us babes, email your creation to Emily@stampingbella.com by thursday night to be included in a draw for some bella bucks.

Have a great weekend all!

Pauline

Sunday, January 23, 2011

The Devil made me do it!

Well no, actually Jeanie made me do it! It's all her fault.  I love these Bugaboo images, if you haven't seen them you should check out  Jeanie's blog for her amazing cards.  They are fun to color and easy, which makes me happy. The nice thing about these stamps is that they are digital, and if your like me and you order something you want them now, not in a week or two. You just buy, download, print them off and they are ready to color.


So today I share with you a Stella image called Stupid Cupid.  I printed them on Papertrey Ink white card stock then colored her with Copics. She was cut out with an oval s/binder and then layered onto some bazzill pink c/s which was cut with an oval scallop s/binder die. DP paper is Basic Grey Blush. What I also like about these digi stamps, most of them come with a sentiment.  After printing it off I cut it up into 3 pieces so I could layer them on the card like I did.
Finished it off with some glitter on the heart, couple of red rhinestones and some ribbon.

Thanks for stopping by...

Pauline

Wednesday, January 19, 2011

Coffee Mug Girl.

Good morning!  Well we are mid way through the week.  I am totally mixed up on my days this week, I thought today was Tuesday (again), so I feel a bit behind this week.

Today's post will be short, I have to be to work in 1/2 hour!

I picked up this cutie - Chloe the Coffee Mug Girl when I was in Bellaland back in Nov. Since we are heading into Valentine's I thought she would work perfectly!


I stamped Chloe on bella's bestest paper with black memento ink and colored her up with my prismacolor pencils and blended with gamsol.
The DP paper I'm using is unknown, think I got it as a freebie when I purchased something online- not sure - anyhoo, thought it went well, nice bright colors, and has little hearts on it - perfect for Valentines. For the heart on her mug, I stamped off another one, colored it up and popped it on top of the main image using scrap dots, another item I purchased in Nov. 
I did a double row of scallop border along the bottom, then finished it up with some bright pink ribbon, and some glossy accents on the heart.


Don't forget about our bellariffic friday challenge - it's FREE FORM - which means you can use any image  and any layout you choose.  Email your creation to Emily by thursday night and you will have a chance to win some bella bucks- everyone loves bella bucks, so come along and play!

Thanks for stopping by, see you on Friday.

Pauline