To finish off I cut several flowers and leaves out of spring like colours and adhered to bottom of egg and then added some gold half pearls.
Thank you for stopping by today. Wishing you all a wonderful Easter!
Pauline
Thank you for stopping by today. Wishing you all a wonderful Easter!
Pauline
Hi! It's been a while since I've posted. I've just been busy with work and home stuff, and haven't been in the mood lately for stamping. Although, a friend has reached out and asked for some more sympathy cards & Easter cards, so I am back to doing those.
I have a few done but no pictures taken as of yet, but this one today is one I made for my last order in Nov and never posted.
This is a Penny Black branch which I just inked as it was in my Misti, spritzed a bit and then stamp. I then splattered some gold ink, and sponged some light pink around the 2 sides.
I tore the top right corner and curled it back with my fingers. I then stamped some text (Magenta Rubber Stamps) up in the corner before adhering my floral layer.
Sentiment is from Simon Says Stamps - stamp in black.
Added some small pearls and some gold washi tape to finish this off.
I thank you for stopping by, have a wonderful day!
Pauline
Hi there! Hope everyone is keeping well. I haven't had a chance to make anything new lately but I was going through my cards that I made for my last card order back in November and came across a few I never posted.
Today's card is a sympathy card. I started by sponged some soft blue, and yellow for the background. Once that was completed I put my it in my Misti, added the Penny Black stamp - Trailing to the other side, then continued to add various green inks, misted lightly and stamped. I continued to do this until I was happy with the results.
I stamped the sentiment also from Penny Black in black versafine. I didn't want to add any bling or such, just wanted to keep this simple, so I scored a line along the bottom and up the right side for a bit of detail.
I appreciate you stopping by, see you again real soon! Hugs,
Pauline
Hi everyone. Hope you had a good weekend.
Today, I have another Valentine card to share, this one is more on the 'masculine' side.
I started off by hot foiling the background using bronze foil and The Greetery - Deco Triangles Hot foil plate onto some kraft cardstock. I then stamped one of the sentiments from Pretty Postmarks in a kraft ink, then splattered with Tim Holtz holiday mica stain - Peppermint Stick.
The wood heart slice die is also from The Greetery, cut it once from dark brown and once from kraft. On the kraft piece I sponged some distress oxide walnut stain around the edges. Love is also from the Greetery, cut 2 times and adhered together. I die cut some red hearts and then adhered them to the card.
Finished off with some gold pearls, some small black hearts from Trinity Stamps and a little twine bow on the 'love'
Thank you for stopping by today. Have yourself a wonderful day!
Pauline
Hello, hope everyone is doing well. I meant to post this last week, but it didn't happen so posting today. I have a standing order with a friend, and although she didn't reach out to me yet to ask(which she normally does as a reminder) for some Valentine cards & St Patrick, I was being pro-active, made them and popped them in the mail to her. She should get them this week, which will be a nice surprise for her, because normally I run so late with getting her orders done, not because I don't want to, just because sometimes you don't have the time.
But regardless, I will share a couple I made for now.
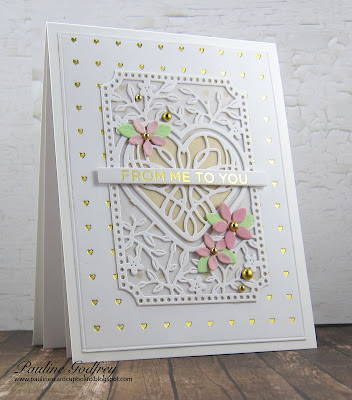
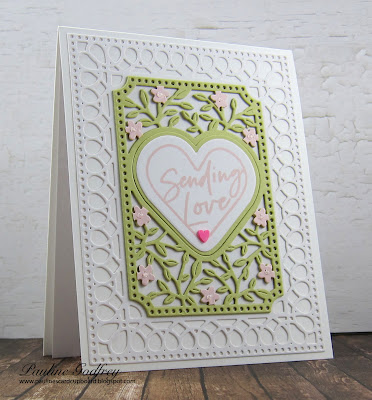
Both cards are using the same dies from Spellbinders January Dies of the month club (large & small dies) from 2021. I ordered this back last January when it was released, but by the time it got to Canada it was already into Feb, which was too late. So I used this for this year.
The gold heart is a hot foil glimmer plate called Heart Grid. Love how this foiled using gold foil!
After I die cut the center piece, I laid a piece of Vellum behind it, then adhered to the card front. The flowers and leaves were die cut as well, then added them to the front along with some gold pearls. I gold foiled the sentiment as well, added some foam tape and popped it up. I also added a die cut heart in gold and layered that behind the vellum, in order to make the heart stand out from the front side.
Good day everyone! It's another cold and gloomy day here today, a bit of rain this morning with a high of 3C (37F) and then it turns bitterly cold again for Monday & Tuesday (feeling like -17C & -15C). We had a bit of snow last week, but with the rain it will be almost gone. All I can say is bring on the Spring!
I had to make some sympathy cards to go along with one of my Christmas card orders, so today I will share a couple of them with you.
For my first one, I am using Gina K's Wild Blossoms. Using my Misti, I lined up the stamp to my paper, then inked the vine with green ink. I then added the flowers one by one using a stamp and acrylic block, these were very easy to line up along the vine. I then stamped the sentiment in black, then cut out the image using Gina K's master layouts 2 stitched rectangle die and matching layer. To finish off I added 3 tiny white pearls.
Well, that's it for me for today, I need to start working on some Valentine Day cards for my friend. Hope you all have a wonderful day, whatever you are up to. Keep well,
Pauline
Hello everyone. I hope you all had a wonderful Christmas and a Happy New Year.
I still have a few Christmas cards to share that I didn't get a chance to post before the Holidays. Today I have a couple of cards made using Penny Black Stamps & dies.
Once stamp (PB - Brilliance) was in my Misti, I added various ink colours to the stamp, spritz and stamp. I continued to do so until I achieved the depth in colours I was going for.
I then cut the frame - (penny black - stitched frame) from white cardstock. I placed it over my dried image and then sponged ink into the corners before adhering together. Sentiment was then stamped, and glossy accents added to the berries.
Hello! I'm back today to share a couple more Christmas cards using stamps from The Greetery - Winter Sketches, Opposites Attract Holiday & stencil - Frosty Flakes. The Merry Christmas sentiment stamp on the blue version is from Gina K
I've seen a few cards on Pinterest using this stamp set and just love how festive this stamp set is.
Both cards are made the same just changed the colours and sentiments. I aligned the card fronts in my Misti and stamped away, stamping the bottom first, the flipping my card front around and ink and stamp again. This set is multiple stamping which I love because it gives you so much dimension for real life look. This is a very quick and easy process, so I ended up making 8 card fronts all at once.
For the branches I used Pink Fresh Gathered Twigs, greenery - Gina K Fresh Asparagus (I think, I had too many greens on my desk, now can't remember which I used), blue berries - Pink Fresh - summer shower & storm. Outside snowflake border - sponged distress antique linen through the stencil
My plan was to post this last night for today, but we are have some major internet connections. I even had to go into work today, which usually I work from home on friday's and mondays :(. Looks like we won't be able to get anyone out to look at it until early next week.
I popped on after dinner tonight and it is very slow, but thought I would create this post and see how far I get.
So here is another Christmas card I made. Lots of these cards are around on the internet. Image is from Tim Holtz - Cozy Christmas. Love his Christmas images.
I stamped it onto some canson water colour paper using black archival ink. I then used some distress reinkers and coloured the image. I then sponged the back ground using distress tumbled glass and faded jeans, some shabby shutters and anitque linen.
Then came out the sprays: Oxide distress speckled egg, and pumice stone. I then took some walnut distress ink and went around the edges to darken it up.
I cut the image down with an MFT stitched rectangle die, layered it onto some antique gold stardream c/s, then onto some dark brown c/s for the base.
I cut the snowflakes (Memory box) from kraft c/s then applied some embossing ink and then embossed them using some chocolate sparkle embossing powder from Sparkle N Sprinkle.
I also added some tiny little gold star sequins along to top portion for a bit of added interest.
What do you think? I love it, need to make more. I made 2 so far, but need to get an assembly line going with this.
Thanks for stopping by. I hope this will post, doesn't seem to want to save, but I'll keep trying.
Have a good weekend
Pauline
Hi! I finally got around to taking pictures of my cards. I also finished 2 of my card orders this weekend as well, what a good feeling that is!
A few months back when I had no mojo, I saw these Penny Black images. What's great about them is they are already printed, all you have to do is make/add them to a card. You can be a simple as you like or elaborate, choice is yours.
I'm so glad I purchased these as I made several of these images into cards. They work up so fast. Today I have 3 to share.
For my first one, I layered the image onto so antique gold shimmer cardstock. then onto some white which was cut using Penny Black Zig Zag Stackers die, then adhered this onto some navy cardstock. I then took a sentiment also from Penny Black, stamped in black, then cut out with a narrow sentiment die. Snowflake is from Penny Black - Ava Snowflakes - used the 3rd size. I then used my quickie glue pen and dotted the roof of the house and into the trees, and added Simon Says unicorn dust glitter.
Hi! Hope you had a good weekend. Mine was busy, and spent most of the day Sunday working on my Christmas card orders. I still haven't gotten around to taking pictures of any new ones yet, but I do have one from a while ago to share.
This one is using Pinkfresh Studio Enchanted Meadow. The entire card was done using stencils.
![]() |
Hello everyone! Yes it's me, I'm finally back. I'm pretty sure I don't need to explain my whereabouts over the last 4 or so months, but as it happens to all of us, family life and work life sometimes takes priority over crafting life.
I was wanting to get back at it back in Sept, but I just couldn't get my mojo going no how. This weekend I was able to start my Christmas cards, although I don't have pictures yet, I realized there are some cards I made back in June & July that I have not posted.
Today's card is one I made for a friend who is expecting her 2nd grand daughter, so she needed this early to send over to Australia.
The 'bundle of joy' die set is one I've had for a few years, purchased from AliExpress. I cut out the pieces, then sponged some light pink on the stork and sack. I then added some foam tape to the back of bundle of joy, added some sequins on the bottom layer, adhered the top and voila a shaker card!
Papers are from Echo Papers - Bundle of Joy. All the other supplies - flowers, lace, ribbon and pearls are from my stash.
I've been off since Thursday, enjoying some much need time off from work. I put up my Christmas tree up on Friday, oh it looks so pretty! I'm back to work tomorrow, so I'm going to visit a good friend this morning as we catch up and chat over a cup of java!
I wish you all a wonderful day! Hugs,
Pauline
Hello everyone! Hope you had a good weekend!
Today I have a couple more sympathy cards which I made for my last card order.
All products are from Altenew -
My first card is using the stencil and die from Hill Blossoms set. I used Altenew inks for this. Once my floral was all stenciled I cut it using the matching die. For the background I took a stencil and sponged some light ink just for some added interest. Sentiment was stamped in black versfine, and then a few pearls were added to finish this off.

I love using the stencils, they make for such a fast and very pretty card.
Thank you for stopping by today. See you back here real soon. Take care,
Pauline
Hi, I'm back. I kind of lost track of time to tell you the truth. Lately I find the days just roll right on by. Last week it was a holiday here in Canada on Monday, so when Tuesday rolled around to go to work, I thought it was Monday, so on and so on, it just messes with you week!. I haven't been stamping lately either (seem to have lost my mojo) but I had this one done last month, so thought best to share with you today.
Using Pinkfresh Studio products, washi tape (English Garden), dies, glimmer plates and gold pearls.
If you haven't used PFS washi tape, I must say it is the best. Several images in each set, and there is about 19-20 sets on one roll. Basically just cut it off between sections, adhere to white c/s, use the matching die (which cuts all your pieces at once, as the die is one large with all the floral pieces in one). Once the die cutting is done, then you just need to create your card.
I also used the glimmer hot foil plate for my sentiments, again this has several sentiments on one, so foil your paper then die cut all at once then you have several sentiments to use.
I used PFS mini slim line die for my top layer. Once I adhered everything down, I added some gold pearls to finish this off.
Well that's it for me today, Hope you are all keeping well. We have another hot week ahead of us, temp close to 40C (over 100F).
Pauline