Belted Kingfisher

Belted Kingfisher

Monday, January 18, 2016

Sunny sunflowers

Hello! I'm just popping in tonight for a quick post.  I received my Papertrey Ink order last week, and just couldn't wait to use my new 'sunflower' die plate. 

Here is the first one:


I cut the sunflower die using  cougar white 100lb card stock.  I attached a die cut - Happy Birthday (Impression Obsession) to the back side of the sunflower frame, then layered this onto a piece of Prima Fairy Flora paper. I added some tea dyed seam binding ribbon and added a little tag with a butterfly epoxy embellishment.  I then layered this onto a piece of SU Kiwi kiss card stock. I added some PTI rain drops here and there and used my wink of stella clear pen to add some glitter to the center of the sunflower.


For my second card:


For my second card I used SU blush blossom for my card base.  Cut another sunflower frame and adhered it to the base. I used the match sunflower stamp - botanical blocks and stamped it on white card stock using blush blossom.  I cut around the edges then layered this onto another piece of white card stock cut slightly larger and edged using my krylon gold pen. My sentiment is from Power Poppy - simply camellias - stamped in grey versafine. To finish I added some gold sequins and a tiny white bow tied using my bow easy. I also used my wink of stella clear pen to add some sparkle to the center of the stamped sunflower.

So there you have it, a couple of easy quick cards - great for when you in a pinch.

Thanks for stopping by, see you again real soon.  I have an Art Impression card to share next.

Pauline

Thursday, January 14, 2016

Hellebores

I think my 'mojo' is slowly coming back. I managed to make another card on Monday when I as off - so that was 2 in two days! This time I'm using the new digital image from Power Poppy called Hellebores.

I couldn't believe how many colour variations this flower has. I know I'll be making more cards using this image.


After downsizing the image to what I needed, I printed then colouried using primsacolour pencils and blended with gamsol.  I then cut out the image using a square spellbinder die.  I really wasn't sure of the layout and I must say this was not the layout I had in mind at the beginning.  But you know how that goes right?.

After going through numerous paper packs looking for the right colour of dp, I decided on a piece from MME - In bloom.  I cut a square frame - using one size smaller die for the inside frame than the die I used for my image. The outside frame I used the smallest die from the Grand Square Nestibilites.  I then cut it again from white card stock to give the dp  some stability.  At first I wasn't going to raise it up I was going to glue flat to the card, but liked the raise effect better, so I cut a another frame from fun foam (love this stuff)! After gluing the dp to the c/s, then to the fun foam I had my frame made. The back layer I did some embossing with a sizzix folder - sorry no name on it.
Your probably wondering why I only embossed it so far down - well let me tell you - lol - I put the 5.25 x 5.25 into the embossing folder - well you know it only goes so far, and I had to make sure the folder and paper would run through my cuttlebug.  This sizzix folder is a bit bigger than the normal A2 size, so I couldn't run it though like I normally would.  Then I went to put the other edge into the folder and because the folder is longer it would only fit in one way and the the other end of the paper was sticking too far out I was unable to run it through, so I left it.  I guess (thinking now as I type this) I could of got out my grand caliber and did it that way. Oh  well, I guess it was meant to be - I actually like it.

To finish of I added some enamel dots and glitter to the center of the flowers. I was going to put a sentiment on the front, but I find sometimes in my sale basket if there is a specific sentiment, then it will just sit there until someone needs it, where as if no sentiment it can be used for many occasions.

Okay, well that was a long post today, hope I didn't bore you with all the details.  Thanks for your visit. See you again real soon,

Pauline


Tuesday, January 12, 2016

Winter birds

Hi everyone.  No card to share today just some photo's Bill took on Saturday.

After rain on Friday and Saturday morning, it cleared up in the afternoon, so we decided to take a drive out to Rondeau Provincial Park (it's about 1/2 drive or so), since we haven't been anywhere to see birds since the weather hasn't been that great on the weekends.

We were quite surprised at how many we did see.  Here are some of our favourite pictures Bill took - enjoy!


Thanks for stopping by.
Pauline

Sunday, January 10, 2016

Jubilant

Hello all.  Today I can actually say 'winter' has landed.  After having mid 7C (40F) yesterday we went down to -4C feels like -11C(25F feels like 10F), with it first starting out with rain until the temps fell to below 0C and then the winds and snow blew in, complete whiteouts at times.  As I'm writing this, the snow has stopped but the strong winds are still there.  I just looked out to my backyard and I just counted 28 cardinals both male and female combined eating on the ground and feeders, along with sparrows, house finches, blue jays and juncos. Very picturesque with the male cardinals red bodies against the white snow.

I managed to  snap this photo of Mr. C (as I call him) from my craft room.  Not the greatest because of the window/screen, and also because of the wind it is a bit blury.


I'm still struggling with my 'mojo' but I did manage to colour up a couple of images and I just finished putting one together.

I decided to do some distress watercolouring.  I don't do this technique very often, so thought I would give this a try.  The image I'm using has some open spaces to colour, so room to move the ink around.

I am using Penny Black's - Jubilant.


I didn't keep track of the distress markers I used for this.  I stamped the image in black archival ink and then coloured small areas with the markers and used my koi paint brush to paint.  Once the image was painted I dried it with my heat tool to speed things up and then did the background.  There was some bleeding of other colours, so not perfect, but hey it's water colouring right?

I cut the image out using an oval spellbinder die and let one of the buts, leaf tip and branch extend beyond the die.  There are many ways to do this, the way I do it is lay my die over my image until I'm certain where I want to cut, then make light pencil marks on the inside of the die edge where I need to cut my image where it extends outside the oval.  I then cut the image part I need to up to the pencil markings, lay my die onto my image and life the cut part over top of the die - this way it will not cut.

I then layered the image onto a piece of white card stock cut using spellbinders elegant ovals.
Designer paper used is from Kaisercraft - Kaleidoscope.  For the bottom edge of the green paper I used spellbinders scalloped border two.  I wanted to add a sentiment of some sort, so pulled out my little tags from spellbinders back to basic tags.  The sentiment is from Penny Black -snippets.
To stamp the sentiment I used my MISTI.  Since the sentiment is one line, I first stamped the 'just',
cleaned the stamp and then aligned the 'for you' onto the white card stock under 'just' then closed my MISTI and stamped.  I didn't get a very good impression, so I re-inked 'for you' and stamped again. Thank goodness for the MISTI other wise I would never be able to re-align it again so perfectly.

To finish off I added a tiny bow (thanks to my bow easy) distress clear glitter and clear sequins.

Thanks for stopping by today. Have a wonderful day.

Pauline


Saturday, January 2, 2016

Love is in the air....


 Hello everyone! I'm a little late but Happy New Year to all - honestly where did 2015 go?  When 2015 left so did my mojo. I've tried many times to sit and make a card over the holidays and I just can't do it.  Do you ever get like that? I hope I get it back shortly.  I had big intentions of making many cards for my sale basket over the holidays.

But..... remember when I was on the design team for SCS, well we are not to post the cards we make for SCS for 6 months on our blog or publications,  so now I can start to share the cards I have made for them.

My image is from Stamping Bella -  Emily & Ryan under the umbrella.
 

I coloured the image using caran d'ache pencils & gamsol .  After colouring I cut the image down to the size I needed, layered this onto a piece of pink card stock then stitched around the edges.

Designer paper is from Bo bunny - prairie chic.  The sentiment I used is from a Verve set called - heart to heart.

Finished off with glitter, pearls and silk ribbon.

supplies:
Stamp - Stamping Bella - Emily & Ryan under the umbrella, Verve - heart to heart
ink - black memento, black versafine caran d'ache pencils and gamsol
paper - white cougar, pink, Bo bunny - prairie chic
misc - glitter, pearls, pink silk ribbon

Thanks for stopping by.  I hope my creative juices return soon!

Pauline

Sunday, December 27, 2015

Delight in the little things


Hi everyone.  I hope everyone had a fabulous Christmas.  I was spoiled for Christmas as well as my Birthday which was yesterday on the 26th.  For one of my gifts I received a MISTI - which I can't wait to play with. Hopefully over the next week I'll get a chance.

The card I'm sharing today is one I made back in the fall.  I used Papertrey Ink Stamp set and co-coordinating die, as well as the papers.  I love doing cards like this where you cut out the die shape then stamp the matching image.  


My sale basket at work is pretty much empty I think I have something like 5 cards left, so I need to start creating again to fill it up with a variety of cards. So stay tuned for some new cards to be posted.

That's it for me today, don't have much planned so hopefully I'll work on some cards.

Enjoy the rest of your Holidays, I can't believe 2016 is just 5 days!

As always, thanks for the visit today, take care

Pauline


Thursday, December 24, 2015

snow is glistening

Hello everyone!  Well things are starting to get back to normal.  As of today I'm off for the Holidays until next week, just have to work 2 days - Tues & Wed, then off again until Jan. 

Are you ready for tomorrow?  I can't wait until tomorrow when Mark, Anna and my 2 grandsons come home.  I'm so excited!  I'm pretty much done, groceries are bought, presents wrapped, baking is done, although I'm going to try a gluten free shortbread cookie recipe for Bill.  It makes it hard sometimes to bake for him, most recipes you can substitute the flour for gluten free flour.  I find they just don't keep as fresh as regular cookies do.

I am so far behind in my blog reads, but I plan on getting to them sometime over the holidays.

I thought I would share another quick card I did. 


I stamped the image on some cream linen card stock using SU cherry cobbler.  Cut it out using and oval spellbinder die, then sponged ink around the edges.  I then layered the image onto another piece of cream linen cut using spellbinders floral oval.

I used a scrap piece of designer paper for the bottom, then wrapped a piece of burgundy crinkle ribbon around the layer and adhered to the card base.

I added a vellum poinsettia (memory box) and lots of distress glitter (clear rock candy) to the image. it is so sparkly in real, very pretty.

Thank you everyone for stopping in for a visit during this busy time of year.

 All the best to you and your families during this Holiday Season, be safe!  Have a very blessed Merry Christmas. No snow for us this Christmas, sunshine and a high for 46 F.

Hugs,
Pauline

Sunday, December 20, 2015

Deck the Halls

Hello everyone.  It seems forever since I have posted.  I had some major compute issues.  My hard drive on my MAC died, hence why I haven't been posting.  I'm finally back up and running thanks to my hubby (he's my IT guy). I haven't had much time in the line of card making, with the crazy hours at work - this is the last week of over time - 3 more days- thank goodness, then maybe life can get back to normal! I just finished mailing the last of my Christmas cards as well.  I'm so far behind this year.  I still have shopping to do as well, along with wrapping and baking. I also have a whole list of blogs that I follow that I need to pay a visit to. I will eventually get there.  So little time!


For my card today, I used PTI - wreath for all seasons. Love this set, it comes with a variety of images to create your wreath.  I stamped the grape vine wreath first using dark chocolate ink (PTI), then punched a circle post-it-note and placed it in the center of the wreath.  Next I took the pine needle sprig stamp and repeatedly stamped the spring using spring moss ink (PTI).  Lastly I stamped the holly berries in SU cherry cobbler. 

There are a few different bow dies and images with this set.  I first die cut the bow then  I stamped it in cherry cobbler.  The sentiment was stamped in dark chocolate.

For the bottom of the card I used some peel-off's that I've had for a few years.  I actually have a whole container of these peel-off's in a variety of various images and sentiments.  I never think to use them. 

To finish off I added some Tim Holtz distress crystal glitter to the wreath and a gold bead to the center of the bow.


Well folks, this is a wrap!  It's been a long day.  We performed our Christmas Cantata at Church today. That in itself is very exhausting.  It's a lot of practicing over the last couple of months, but I must say it sounded beautiful.  We sang a beautiful arrangement by Marty Parks called 
"A Christmas Offering".

Thanks for stopping by, have a wonderful day.

Pauline

Wednesday, December 9, 2015

Peace, Love & Joy


Well hello everyone! Sorry I haven't posted in a while. It's just a busy time of year.

Remember when I said that I had all those cards to make for my orders, well I picked cards that I could mass produce and this was one of them.

A fairly simple card  --


Not much in describing how to do this, most of it was die cutting.  So I started with die cutting 2 of the Spellbinders 2010 Heirloom Ornaments.  On the small of the ornaments I embossed in platinum - peace, love & joy - a sentiment from PTI.

My base layer was die cut using a MFT die-namics #12.  The top layer is a Memory Box die (not sure of the die name it was borrowed from my friend Nancy). 

To put it all together I popped up the smaller ornament over the bottom one, adhered the memory box die to the top ornament and applied some small pop dots underneath the trailing vines to hold them up. I also cut the center of the die with some silver glitter paper then popped the silver into the die cut area to give a bit of sparkle.  I used my wink of stella clear pen and added this to the memory box die cut, then added some pearls hear and there and Voila - done!

Thanks for stopping by,

Pauline

Sunday, November 29, 2015

the owl family


Hello everyone! Hope you are enjoying your weekend.  Yesterday was an exciting day for me. My future 
'daughter-in-law' invited me to the big city to go wedding dress and bridesmaid dress shopping with a couple of the bridesmaids (not all could make it).  Anna had already picked out her dress so we got to see her model it.  Oh my goodness, as usual I cried, my eyes just welled with tears, she was gorgeous - breath taking actually! The girls picked out their dresses as well - full length, dark grey - lace on top (sleeveless) and tulle for the skirt - stunning.  Now it's just the waiting game - 10 more months!

Today I have another Christmas card I made.  This one is using a Wild Rose Studio image. When I first saw this image on Simon Stamps website I knew I had to have it.  There is just something about the Wild Rose stamps - they are just so adorable.

I stamped the image onto some white cougar 100 lb card stock using black memento ink.  I pulled out my prismacolour pencils and began to colour.  After die cutting the image I left the die in place and sponged some soft sky around the image.


The sentiment is from PTI - stylish sentiments holiday set, which was stamped on a die cut using PTI - double tag ends die.  

For finishing touches I used glitter (of course), white flock for the hat trims, and the Memory Box holly bouquet die.  I cut this twice - one from green paper and once from red.  Inserted the red holly berries into the green die cut.

supplies:
stamp - wild rose studio - owls, PTI - stylish holiday sentiments
paper - studio calico - wonderland, bazzill green, cougar white, SU cherry cobler and misc scraps
ink - prismacolour pencils, black versafine, black memento, SU soft sky
dies - spellbinders ovals and scallop oval, Memory box - holly bouquet, PTI - double tag end
misc - glitter, white flock

I hope you enjoyed my card today.  I love when you visit.  Enjoy your day,

Pauline

Wednesday, November 25, 2015

Cheers to you!


Good morning everyone! It's going to be a beautiful day here in SW Ontario.  A great way to end my 3 days of vacation, back to work tomorrow :(.  But as I had hoped I did accomplish what I had set out to do for my 3 days off.  I completed one card order (13 cards), and I have 2 more birthday cards to make for my other friend who ordered a total of 20 cards.  I hope to get those 2 cards done today.  Then I just need to work on cards for me to send and for my sale basket at work.

My card today features an Art Impression image.  I just love these images, I mean who doesn't right?  For the last couple of years I have always bought at least one of their holiday images, and they always seem to be a big hit!


After stamping the image I coloured using copics.  I used an MFT stitched rectangle to cut her out.
I needed it a bit narrower, so I placed the image back into the die but in about 1/2" and then ran it through my big shot. I have done this many times, its a great way to stretch your dies, without having to buy more.

After this was put together, I added some white flock to her coat trim and glitter to the wine and holly.
The sentiment was stamped using black versafine, cut out using sb circle die, trimmed it with  gold krylon pen, then adhered it to a small scallop circle.  I added a couple of enamel dots and Voila! I made 4 of these, but they are already gone, so need to make a couple of more.

Supplies:
stamp - Art Impressions - cheers to you #4664
Ink - black memento, black versa fine, copics - E000, E00, E01, E11, E23, E26, E27,R12, R20, R24, R27, R29, R39, R56, YR20, YR21, YR23, YR24, YR27, YG61, YG63, YG67, C0, C1, C7, Black, W3, prismacolour french grey 90% for ground shading
Die - spellbinder - circle and small scallop circle, MFT - die-namics #12,
paper - white cougar 100 lb, scrap dp, SU cherry cobbler
misc - white flock, quickie glue pen, enamel dots, distress glitter - clear rock candy, gold krylon pen

Thanks for the visit today.

I would also like to wish all my fellow American followers a wonderful Thanksgiving. We have so much to be thankful for! In saying that I would like to thank everyone for their continuous support in visiting my blog.  You inspire me to keep on creating!

Hugs
Pauline


Friday, November 20, 2015

Birdie on a branch

 Hello!  I'm back to share another Christmas card with you. This time I'm using this cutie patootie birdie!  Isn't he the cutest?  This is a digital imaged purchased  here.  I have several of her 'birdie' images, just need to find the time to colour them.  


I used prisma colour pencils to colour.  For papers I just used some scraps from my basket, and I already had the aqua blue die cut, it was also in my basket of odds and sods and worked perfectly for my card.

For the sentiment I stamped it using black versafine.  The sentiment  is from PTI as are the double end banner dies.

To finish I added some white fun flock to his hat and glitter along the branch to represent glistening snow.

I am off until Thursday, so I plan on getting a big chunk of card orders done.  Between 2 friends I have 24 Christmas cards and 8 birthday, not counting all the cards I need for my sale basket at work, and ones for myself. I really have my work cut out for me.  I need to find some easier cards and mass produce!

Thanks for stopping in today.  Enjoy your weekend. Winter is upon us here in Ontario, snow for some, rain for others, but temperatures down near 0 over night and not much warmer during the day until next weekend when it warms up again.

Pauline

Sunday, November 15, 2015

Little drummer boy


Hello everyone.  Hope your enjoying your weekend.  I tell you is sure doesn't feel like Nov here, 15C (59F), sunny light breeze, just a beautiful fall day.

For my card today, I'm using an image that I have had coloured for a few years.  Yes, I'm thinking maybe 5 years now maybe 6.  This was one of the first images I coloured when I was learning how to colour with my new copics,  he was tucked away for safe keeping and I came across it a few weeks ago and decided I best use him on a card.

I believe the image is from Whiff of Joy.


Sorry I'm unable to list the colours I used, just too long ago and never wrote them down in my book.

Paper is Basic Grey from my scrap bin.  I used a Impression Obsession snowflake die and Memory Box christmas baubles die and added enamel dots to the centers. Sentiment is from Papertrey Ink stamped in black versafine.

It's too bad I didn't have more images coloured up from the past, it sure makes for quick card making!

Enjoy your day, thanks for the visit.

Pauline

Tuesday, November 10, 2015

winter bough

Hi everyone.  I think I can come up for air now.  I have all my SCS cards posted for the month, and now I can focus on Christmas cards for me and for my orders, along with several birthday cards that have been requested.  This is also my last month being on the DD Team over at Splitcoaststampers. I can't believe how fast 6 months have gone. It has been a great journey, it has really made me think outside the box at times for each month theme.

Okay, so onto my card.  I'm using today a Power Poppy image from the set Bough Wow Wow! I am entering this card into their monthly challenge for November - Embellish this.


I stamped it onto some white cougar 100 lb c/s then coloured using copics.  I then cut the image out using spellbinders labels twenty-eight. This was then layered onto some Scenic Route & NRN designer paper.

For finishing touches I stamped off another heart (this comes separately in the set - love that!)  and coloured, then used some foam tape to pop it up, added some sequins and glitter, and there you have it!

supplies:
stamp- Power Poppy - Bough Wow Wow
ink - black memento, copics - YG00, YG03, YG05 YG67, G82, BG0000, BG10, BG11, BV0000, BV01, BV02, B60, B63, B66
dies - spellbinders labels twenty-eight
paper - cougar white, bazzill purple, scenic route - winter words, NRN - winter magic
misc - sequins, glitter, foam tape, stitching

Thanks for stopping by today, have a wonderful day.  I'm off to the dentist, then home for a day of stamping! Yay!! (it's raining so it's a perfect day to stamp don't you think?)

Pauline

Sunday, November 8, 2015

Save the date...

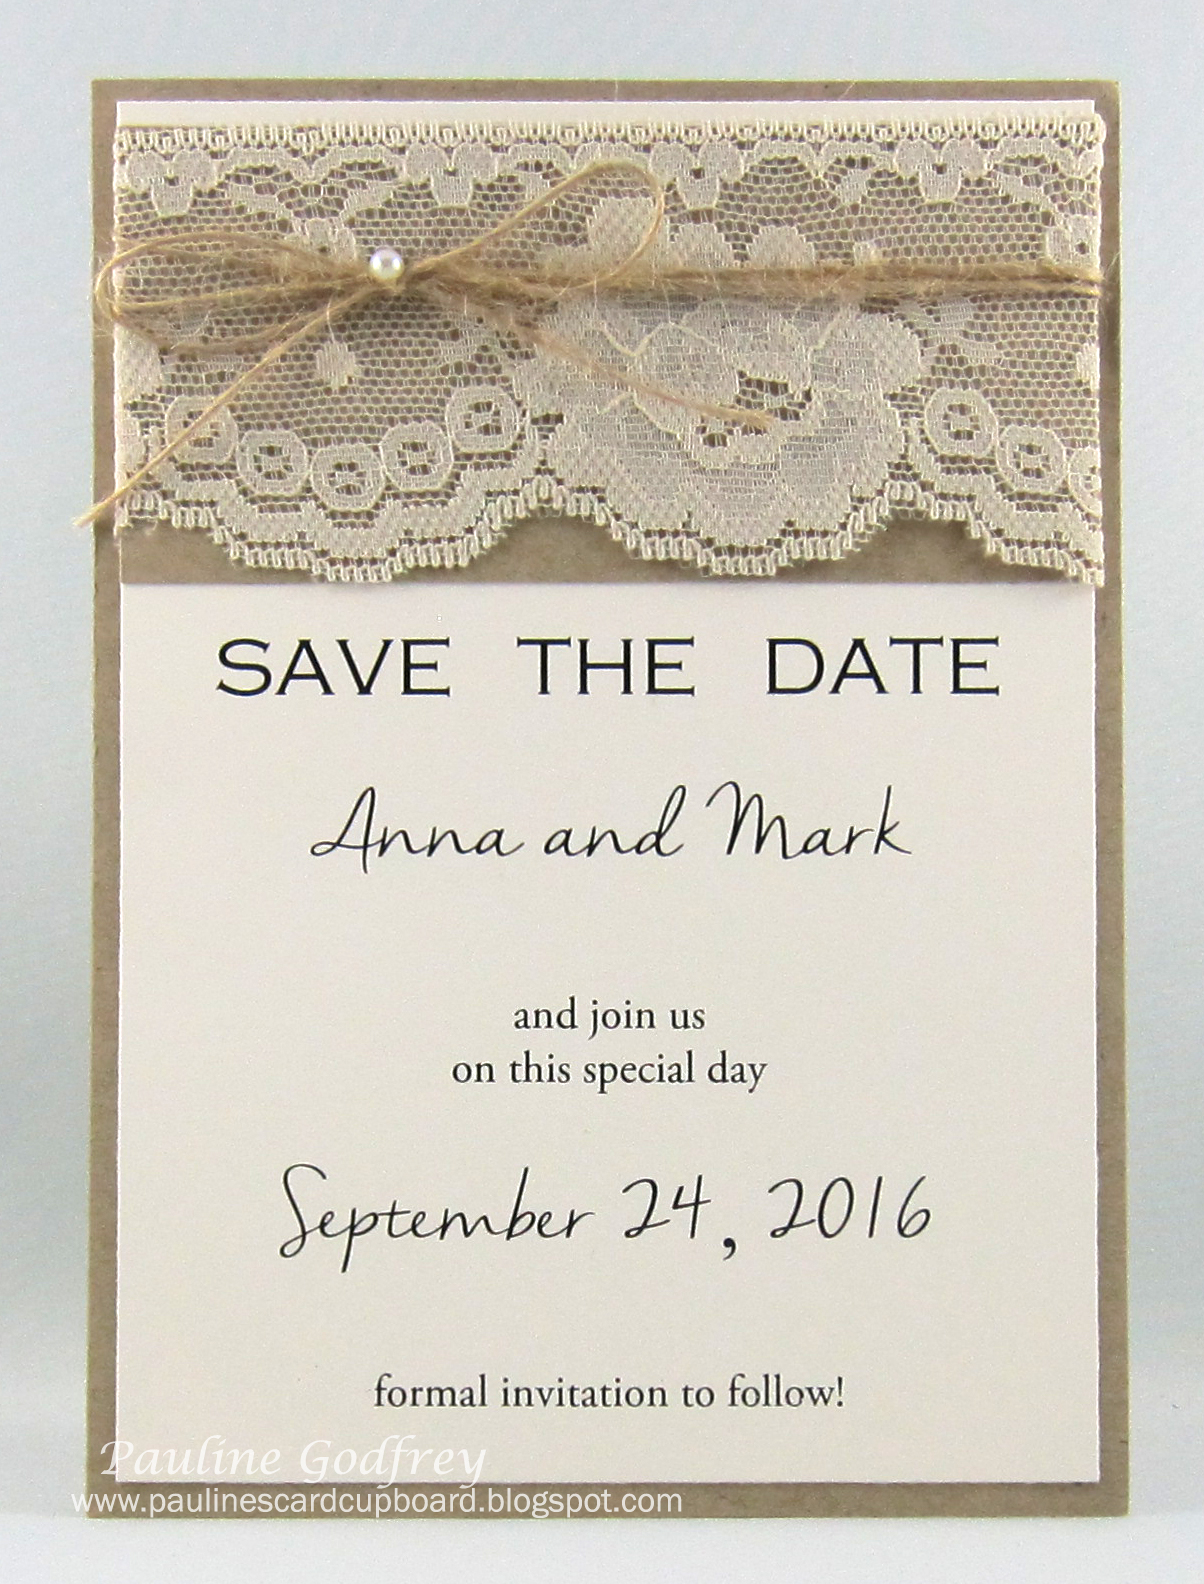
Hi everyone.  Just popping in for a quick post.  My son Mark and his fiancee Anna asked me if I would be interested in doing 'save the date' cards to mail out for their upcoming wedding next year. Of course I jumped at the chance.  I have never done invitations etc before, but this is what I came up with.  It was simple to do, now I need to make 45 of them!


I made this a A6 size one sided. Printed on cream cardstock, layered onto kraft c/s. Added a piece of kraft along the top, wrapped lace and twine around, added a pearl to finish it off.

Thanks for your visit

Pauline